Using RestSharp to consume RESTful Web Services
Note: This was written a long time ago for the then-current version of RestSharp that had experimental Async support. John and his contributors have updated RestSharp tremendously since then, but by now these samples are outdated and only here for illustrative purposes.
Up until a few days ago, I mainly consumed Web Services using the “standard” model – SOAP. Now while that is all great and useful, it’s also a bit painful to debug and work with. So when I discovered REST (Representational State Transfer), it looked like a great alternative. At first glance, REST just looks like a normal URL, and in many cases when it comes to receive data, it is. As a web developer, you may (should) know what GET and POST is and how they work, and in order to receive data, you often just do a simple GET Request. So why overcomplicate things by wrapping it in a SOAP Envelope?
Now, the one big difference is that for REST, you need to know both the Address and the Format of the Request and Response already. To my knowledge, there is no Discovery-mechanism like there is in SOAP. But to be honest, I never ever used UDDI, and while automatically creating classes using a WSDL-to-C# Converter, at the end of the day I was manually implementing the whole thing anyway. SOAP and REST are – in my opinion – two very extreme opposites: SOAP has a ton of specifications and supplementary protocols (WS-* anyone?) which seems to make it great for enterprise applications and semi-closed systems. On the other hand, REST is low-friction, anarchistic and meant for “Strangers” to quickly implement. I see REST growing a lot, but the spearheads are very public internet sites like Twitter, Flickr, Del.icio.us, Amazon or Google.
As said, REST has no defined Syntax, but most services nowadays offer XML and JSON, sometimes both via a different URL or parameter. Now, let’s look at one, shall we? Most public REST Services require you to create an account and get an “API-Key” or similar. That is to ensure that the vendor can control and track access easily and to rate-limit the service. I’ve decided to pick a service that does not require authentication to keep this example low friction, and I found CARMA’s list of Power Plants, who have a description of their REST Service here.
Let’s just consume it, shall we? Open up your browser and send it to http://carma.org/api/1.1/searchPlants?location=5332921&limit=10&color=red&format=xml
Congratulations – you just consumed a REST Web Service! So what did you do? You sent a GET Request to carma.org, requesting /api/1.1/searchPlants. That’s like making a method call. In C# terms, imagine this method being implemented as
public XmlDocument searchPlants(int location, string color, int limit, string format)
(I’ve left out the other parameters for the sake of making a clear example).
If you are wondering what you just retrieved: Location 4338 is the Los Angeles County area (you could use the searchLocations service to search for locations), Color is the “dirtiness” of the power plants (descending from Red to Green), limit and format are self-explanatory. So this is a list of 10 “red”(=dirty) Power Plants in the Los Angeles area.
The result should look like this:
<items>
<item>
    <id>49046</id>
    <name>WATSON COGEN</name>
    <carbon>
        <past>4503176.0000</past>
        <present>4582168.0000</present>
        <future>5401482.0000</future>
    </carbon>
    <energy>
        <past>3827727.0000</past>
        <present>3017826.0000</present>
        <future>3506896.0000</future>
    </energy>
    <intensity>
        <past>2352.9250</past>
        <present>3036.7339</present>
        <future>3080.4910</future>
    </intensity>
    <location>
        <continent>
            <id>5</id>
            <value>North America</value>
        </continent>
        <country>
            <id>202</id>
            <value>United States</value>
        </country>
        <latitude>33.8219</latitude>
        <longitude>-118.2633</longitude>
        <state>
            <id>644</id>
            <value>California</value>
        </state>
        <city>
            <id>60769</id>
            <value>Carson</value>
        </city>
        <metroarea>
            <id>3203</id>
            <value>Los Angeles-Long Beach</value>
        </metroarea>
        <county>
            <id>4338</id>
            <value>Los Angeles</value>
        </county>
        <congdist>
            <id>5298</id>
            <value>Diane Watson</value>
        </congdist>
        <zip>90749</zip>
    </location>
</item>
<item>
  <!-- cut for brevity -->
</item>
</items>
Now, let’s say you want to display this list in your .net Application. What you would do now is writing a function that opens a HTTP Request to fetch the data, a Business Class that holds the desired data, a class that converts the returned XML to a List of Business Classes and an abstraction on top of that so that this module in your application only exposes a “public YourBusinessClass searchPlants()” method. For simple GET Requests, that may be feasible, but why re-invent the wheel? Let’s use some existing Library, in this case RestSharp. What is RestSharp? It is a .net Library for accessing RESTful APIs.
Why would you use it? Multiple reasons. At the minimum, it implements the HTTP Client for you. Also, it automatically converts between the result of the web service (it supports either JSON or XML at the moment) and a custom .net class you create. It makes building the Requests very easy, and it supports all other verbs. To read any sort of data, you usually use GET requests. But many web services also allow you to write data, i.e. to send a Twitter status update. These requests are often made through POST, or (in “true” RESTful web services) through the less commonly known HTTP Verbs PUT or DELETE. RestSharp abstracts all that away from you behind a nice interface.
At the moment, there is no official released version, but it’s open source and hosted on GitHub. Just click on the green "download" button, open the .sln in Visual Studio 2008 and compile. I’m using commit f565e9d1f7d435ed075b45f686520da8bbe39bd7 for this example (the commit GUID is some sort of internal version that Git uses, similar to a Revision in Subversion). After compiling, you should have two DLLs, RestSharp.dll and Newtonsoft.Json.dll. The latter is only used when working with JSON Web Services, so in this example (where we consume the XML output), you can ignore it.
Create a new WinForms application and add a Reference to RestSharp.dll. As a first step, we need to create a few classes to hold our data. In this example, we want:
- A List of Items
- The Name of each item
- The Name and ZipCode of the City
- The Latitude and Longitude
If you look at the XML, you see we need 4 objects:
- A class that implements a List of Items
- A class that implements an item, which holds the Name and the Location
- A class that implements the Location, which holds the ZipCode, Latitude, Longitude and City Name
- A class that implements the City, which holds the Name
We are closely mirroring the Web Service Result here. RestSharp is not intended to create Business Classes – it’s a library that sits in the Model, and it’s task is to consume the web service and give you .net objects to work with. For now, create a new folder "Model" in your Application and implement the Classes.
using System.Collections.Generic;

namespace RestTest.Model
{
    public class CityDTO
    {
        public string value { get; set; }
    }

    public class LocationDTO
    {
        public CityDTO city { get; set; }
        public int zip { get; set; }
        public double latitude { get; set; }
        public double longitude { get; set; }
    }

    public class item
    {
        public string name { get; set; }
        public LocationDTO location { get; set; }
    }

    public class PowerPlantsDTO : List<item> { }
}
Three things to note here: First, the root class should be a subclass of List<T>, and T MUST be named after the element in the XML. That is because the Web Service returns a List of items, and RestSharp uses the Class Name when working with Lists to properly map it.
Then, the properties to be mapped need to be public properties with the same name as their XML Elements. You are of course free to add other elements and you have no obligation to implement properties you’re not interested in.
Also, you are free to pick your own Class Names with the exception of List<T>. I added the suffix DTO to them to indicate that they are merely Data Transfer Objects – their purpose is only to transfer Data from A to B. DTOs usually shouldn’t contain any logic (not even validation), except maybe for overriding ToString.
Let’s add a Button to our Form and add the following Click event code:
using RestSharp;
using RestTest.Model;

private void button1_Click(object sender, EventArgs e)
{
    var client = new RestClient();
    var request = new RestRequest();
    request.BaseUrl = "http://carma.org";
    request.Action = "api/1.1/searchPlants";
    request.AddParameter("location", 4338);
    request.AddParameter("limit", 10);
    request.AddParameter("color", "red");
    request.AddParameter("format", "xml");
    request.ResponseFormat = ResponseFormat.Xml;
    var plants = client.Execute<PowerPlantsDTO>(request);
    MessageBox.Show(plants.Count.ToString());
}
Run it, click the button, and hopefully you will see a MessageBox with the number 10 in it. So, let me explain what we did here. First of all, we created a RestClient and a RestRequest. The Client handles all the sending of Requests and can be shared across the whole application if you want (Don’t take my word for it, but it looks like it is Thread-safe). The Request is an individual request, which starts of by specifying the BaseUrl and Action (to allow for more flexibility, for example when having different servers for testing and production use). Then, you add a list of parameters. Setting the ResponseFormat is optional – it will tell RestSharp what to expect back. Currently, it supports JSON, XML and AutoDetect which uses the MIME-Type to find out what it is.
The next line is the magic line, the generic Execute<T> method. RestSharp has two methods: Execute and Execute<T>. The non-generic Execute just gives you back a RestResponse object, which contains some headers and a raw chunk of XML (or JSON). On the other hand, Execute<T> will give you back your Model-class populated with data. This is not magic, but a big time saver. To verify that it really worked, add a ListBox to the Form and replace the MessageBox.Show call with this:
listBox1.Items.Clear();
foreach(var plant in plants)
{
    listBox1.Items.Add(string.Format("{0} - {1} - {2}", plant.name,
                                     plant.location.city.value,
                                     plant.location.zip));
}
Click the Button again and you should see something like this:
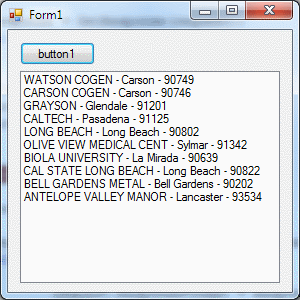
Awesome! Or… is it?
You may be tempted to now use the PowerPlantsDTO and item classes in your application. Or you may be downright turned off by the perceived ugliness of having a lot of nested classes and violating the Law of Demeter with that ugly plant.location.city.value call. So clarify what we have here: We have a Data Model, not a Business Class. Those 4 classes that we have are a 1:1 mapping to the web service. Their purpose is to take the Response and turn it into something we can work with, but it’s very fragile. Imagine the Web Service changes and puts the Zip Code from the Location into the City node – that would be a big breaking change.
So what we really want is a Business Class to work with – that is a class that you use throughout your application and that should almost never change, even if the underlying data model changes. Let’s implement this class then.
public class PowerPlant
{
    public string PlantName { get; set; }
    public string City { get; set; }
    public int ZipCode { get; set; }
    public double Latitude { get; set; }
    public double Longitude { get; set; }

    public PowerPlant(){}

    public PowerPlant(RestTest.Model.item inputItem)
    {
        PlantName = inputItem.name;
        City = inputItem.location.city.value;
        ZipCode = inputItem.location.zip;
        Latitude = inputItem.location.latitude;
        Longitude = inputItem.location.longitude;
    }

    public override string ToString()
    {
        return string.Format("{0} ({1}, {2})", PlantName, City, ZipCode);
    }
}
Change the bottom of the Button’s Click event to this:
var plants = client.Execute<PowerPlantsDTO>(request);

var PlantsList = new List<PowerPlant>();
foreach(var plant in plants) PlantsList.Add(new PowerPlant(plant));

listBox1.Items.Clear();
foreach(var plant in PlantsList)
{
    listBox1.Items.Add(plant);
}
Clicking the Button should give you a similar screen to the one above.
So what have we done? We created a Business Class which is a flat representation of a Power Plant – no more location.city.value, instead just a string called City. We also implemented a constructor that takes an item and converts it. As a bit of icing, we changed ToString to return it nicely formatted. In our Button Click event, we added two lines that convert a List of items to a List of PowerPlants.
Now, if the underlying data model changes, we only need to change the converter code in the constructor of PowerPlant and we’re done. This alone is a huge win already.
But is this everything? We could stop here and go on with it, but I want say one or two things about the converter code.
Currently, it sits in a second constructor of the PowerPlant class. Some people argue that this is a violation of the “Separation of concerns” principle. PowerPlant shouldn’t know about the item class and even less so should convert it. Now, you could just create a new Class “PowerPlant Converter” which has a function “PowerPlant PowerPlantFromItem(item inputItem)”. If you want to be really fancy, you could create a TypeConverter for it. There is also the awesome AutoMapper which makes mapping one type to another mostly automatic and generic, although you still have to specify your logic. I might show an example of AutoMapper in a later posting.
But regardless which path you choose, there are two rules I always recommend: 1. Never use a data model as a business class due to its fragility and 2. Make sure to centralize your Type Converters so that you only have to change it in one place when the data model changes.
[...] Dieser Eintrag wurde auf Twitter von John Sheehan und Michael Stum, RestSharp erwähnt. RestSharp sagte: RT @mstum: blogged: Using RestSharp to consume RESTful Web Services - http://www.stum.de/2009/12/22/using-restsharp-to-consume-restful-w ... [...]
Great post Michael! Thanks for taking the time to write this up. My only suggestion is to use request.AddParameter(name, value) or request.AddParameter(Parameter) instead of request.Parameters.Add(); since it's a little more terse and there's a chance that collection might not be so exposed in the future. A minor nit from an overall excellent article. If there were docs it might be more obvious....I wonder who's fault that is 😉
Thanks again. It will be really nice to have another intro article to point people to.
One more note (again, there needs to be docs for this) that you can name your model class properties using pascal casing and RestSharp will match them up when deserializing the XML. If your property name is MetroArea it would first look for an XML element named 'MetroArea' and if it can't find one, it then looks for 'metroarea' and failing that it looks for 'metro_area'. You can see the code that does that here: http://github.com/johnsheehan/RestSharp/blob/master/RestSharp/Deserializers/XmlDeserializer.cs#L147
Thanks for the notice, I've changed it. I'll have a look at the Automatic-Name-Matching. In my own fork on GitHub I've added an Attribute to arbitrarily Map, but I'm not sure if more attribute-spam is the better solution. Well, maybe having 'ugly' classes is also a good way to encourage writing Business Classes 🙂 I'll have a look soon to see if two things can be improved: List requires the Class Name to match the XML Element, so I had to name the Class "item" instead of "PowerPlantDTO". And I wonder if Execute could take a type converter (I think there is a Converter interface or similar in the CLR) to convert the "Model Class" into a "Business Class" directly. I'm not sure about this though (separation of concerns...). The big reason to use RestSharp is still to avoid having to parse 4-layers-nested-XML manually 🙂
Social comments and analytics for this post...
This post was mentioned on Twitter by mstum: blogged: Using RestSharp to consume RESTful Web Services - http://www.stum.de/2009/12/22/using-restsharp-to-consume-restful-web-services/...
[...] Using RestSharp to consume RESTful Web Services - Michael Stum shows how the RestSharp library helps make consuming RESTful web services easier from C# illustrating with a simple example consuming a search serivce [...]
request.BaseUrl = "http://carma.org"; <---- Unavailable!!!
Seems to work again, possibly a temporary outage.
[...] a code below updated from http://www.stum.de/2009/12/22/using-restsharp-to-consume-restful-web-services/. I’ve updated for latest version of [...]
I've been working my way into my own MVC3 / REST consuming app and this makes things a LOT easier. I can practically abandon older messy APIs and simply work with the REST calls themselves. Thanks!
One of the best tutorial using RestSharp for REST API calls. Thanks!!!
It helps clear up the concept for me and now I can make my app work!
when I run the app, it is asking me for credentials!!!
StatusDescription = "Proxy Authentication Required ( The ISA Server requires authorization to fulfill the request. Access to the Web Proxy filter is denied. )"
ErrorMessage = "'>' is an unexpected token. The expected token is '\"' or '''. Line 1, position 62."
Help
The Web Service I linked has changed a bit in the meantime (I've updated it), but the error message itself makes it appear that you are in a company and that your network administrator is using a Proxy which you're hitting. You'll need to see if you have to add a WebProxy to your Request, check with your Network Admin for details.
I'm at the verge of giving up to use RestSharp, the libraries was updated quickly but the documentation is sub-par. Seriously, this article seems the best tutorial around but even when following this tutorial closely, I'm still unable to deserialize my object. Grrrr.