When it comes to playing fighting games or certain arcade/MAME games, an Arcade Stick can be nicer than a gamepad. You can really mash the buttons and yank the lever (that’s the technical name for the actual stick).
There are many that you can just buy, and that’s probably the preferred choice. Hori has long been a trusted brand, I actually own a Victrix Pro FS, the Hitbox is getting a lot of buzz because it’s all buttons, no lever, and I’m currently waiting on a Snackbox Micro because of it’s size. Seriously, it’s tiny.
But one thing that most (all?) fight stick have in common is that they have 1 lever (usually emulating a D-Pad) and the face buttons, but no analog sticks. Which is fine for a lot of games, but there are some games that actually would benefit from having one.
One example are Tower Konsumables in MK11, which are triggered by the right analog stick. (Also, navigating the Krypt, but arguably it’s easier to just switch to a gamepad for that).
Arguably, this is a niche case, but building my own fight stick sounded like a fun idea, even knowing that I probably learn a lot of lessons while I’m messing up stuff.
The Finished Build
Just starting with the final controller that I built, warts and all.
The PCB
Now, before we get into buttons, levers, etc., the question is how to actually connect it all to a PC or Console.
If you want something for retro consoles like the SNES or Genesis, then all you really need are some simple components like a shift register, maybe a diode or some resistors.
If you ever built your own mechanical keyboard, your mind might go to a Teensy and just emulate a keyboard – and that would work on a PC, except that you don’t get analog controls. Also, keyboards aren’t supported on most (all?) consoles.
If you want something just for PC use, then a Zero-Delay USB Encoder should be all that you need.
But if you want console support as well, you need something better, that actually properly authenticates and communicates with the console. And if you want it to work on a Playstation 4, you also want something that doesn’t have the 8 Minutes timeout issue – the PS4 tries to authenticate the controller every 8 minutes, and if the board doesn’t handle it, you have to reconnect the controller every time.
Thankfully, there are companies that make all in one boards for consoles, one of which is Brook.
They have a variety of boards, and the one that ticked all my boxes was the PS4+ Audio Fighting Board:
Supports Switch, XInput, PS3, PS4, and with an extra board, PS5 in PS5 mode
There is no one-size fits all answer, and the hardware can get pretty expensive. I took the easy way out and bought a $40 set on Amazon with a bunch of stuff in it. It’s… not great, the buttons are a bit mushy and sticky, though the levers seem to be authentic Sanwa. It’s a starting point, and the nice thing about buttons is that I can always replace them later with better ones. There’s also a second lever and two zero-delay USB encoders that I don’t need here, but maybe I have use for another project since I have quite a few leftover parts now.
The larger buttons are 30mm, and the smaller buttons are 24mm diameter. The sticks have a 5-pin output cable, which is a common Ground and the 4 directions. Some sticks might have 8-pins, one ground for each of the four directions. The brooks board uses 5-pin, not sure if an 8-pin connection would work by just tying the ground pins together.
Analog Sticks
When you search for analog sticks, there are many that are meant as replacements/repairs for a PS4/Xbox Controller. These are pretty awful to work with because they have a lot of pins in a weird layout – it’s not a nice even pitch that would just fit on a breadboard/prototyping board. Plus, you need a thunbstick cover, though I’ve seen sets on Amazon that included the thumbstick.
I’m sure they are pretty good as a replacement, but for this project, I went with Analog Sticks that came on a breakout board. These are often advertised as “For Arduino projects” or the like, but they have exactly what I want: A simple 5 pin connection, and a board that just screws in somewhere. The specific ones that I bought don’t seem available on Amazon anymore, but I’ve seen many variations. In the end, they are really just variable resistors anyway, going from 0V to 5V on two different axes, plus a regular button.
I went with a simple option, a plastic project box from Amazon. It needs to be large enough to hold the parts, I picked one that’s 10.4" x 7.2" x 3.7" (263 x 182 x 95 mm).
Stick Layout (and issues with it)
I’ve used arcadesticks before, so I had a rough idea of the layout, which I’ve put together in Affinity Designer to get exact measurements. There are some common layouts, mainly Viewlix and Noir. I went with a Viewlix layout because it seems to be more common for 2D fighters, but it’s taste. I’m not offering the layout for download because it has a lot of issues that I’ll go in, better download a proper template as a starting point.
The nice thing is that if you’re left handed, you can just switch layouts around and put the joystick on the right.
Not shown in this layout are some buttons I mounted on the side. That’s because those aren’t needed during actual gameplay and I don’t want to accidentally press them. I did order some very small push buttons that I didn’t end up using. Select/Start/Home is on one side, and the PS4 Touchpad/Switch Home button is on the other side, along with a turbo button that’s useful for some shooters.
Assembly: Drilling Holes, inserting buttons, getting the spacing wrong
Step one was to print out the template, drill holes using a step bit, and then insert the buttons. For the Joystick, I decided to drill four small holes for an M3 bolt to hold the edges.
Three observations/mistakes here:
Step bits are neat, but the plastic shavings get EVERYWHERE. Do it in an area that you can cleanup easily, I expect to find plastic shavings in my room for weeks to come
Don’t measure the diameter of the button (30mm), but the actual collar/screw that holds it in. I got lucky that I could fasten the buttons, but it is an extremely tight fit – I should’ve added 1mm-2mm extra space around the buttons.
I didn’t consider that my palms would rest below the buttons. The Select/Start buttons are pretty useless here, because I’d press them accidentally with my palms all the time. it might be possible to salvage, but for this, I just left them unused/disconnected.
Mounting Analog Sticks
Here’s where I made some more mistakes. I drilled a large hole for the stick, then some smaller holes to mount M3 bolts to hold the board. The problem is that if the stick is too close to the hole, it would scrape the case. I didn’t have long enough bolts to really get an overly stable mount, as the nuts are at the very end of the bolt. (This photo doesn’t show a third nut at the bottom where the bolt is held into the case.
But even if I had them long enough, the problem when moving the analog stick to the corners (top left etc.), I hit the bolt. So it’s not suitable for smooth movements.
Still, it works perfectly well for what I need it for: Tower Konsumables, and 3D camera movements in some games.
I mounted the right analog stick under the main joystick, which is a pretty good position since my hand is well to the left of it. The left analog stick is mounted on the right side of the stick – I don’t really need it all that often. I did mess up the hole spacing on that left stick and had to expand it with some side cutters. Yeah, “Measure twice, cut once” and all that, but oh well – I knew this would be a learning exercise.
Wires, so many wires
Buttons are in, Lever is in, Analog sticks are in. So, how to wire it all up and end with this beautiful look? Oh boy, this is messy due to bad planning, but as said, I didn’t know what I was doing and figured stuff out as I went.
Now, here’s one criticism of the Brook board: They changed revisions, but didn’t update the docs.
The PDF User Guide shows the old, Rev1 layout:
A Rev2 board has those white JST connectors at the bottom. The main product page shows the correct pinouts, but you’ll be going back and forth between the product page and user guide a bit. Not sure if other fighting boards have similar documentation issues.
The board has two main connections for the buttons/lever: There is a 20 pin connector (J4), and a set of screw terminals at the top. I bought the Fighting Board cable for an extra $20, which connects to the 20 Pin connector and has a bunch of female spade connectors. I could probably have bought a bunch of spade connectors on wires separately, and in hindsight that would’ve been better because I could use longer cables, but the harness made that part pretty easy.
It’s a bit hard to see which cable connects to which button, here’s the pinout of each of the 4 strands coming from J4:
Joystick Pinout
Green
Down
Yellow
Up
Orange
Right
Red
Left
Black
GND
Button Strand 1
Red
START / OPTIONS
White/Red
SELECT / SHARE / BACK
Grey
HOME / PS / XBox
Button Strand 2
Red
2P / Triangle / Y
Blue
1P / Square / X
Purple
4P / L1 / LB
Gray
3P / R1 / RB
Button Strand 3
Orange
1K / X / A
Green
3K / R2 / RT
Yellow
2K / Circle / B
Black
4K / L2 / LT
Additionally, there is a wire with a bunch of GND connections for all the buttons.
For the Analog sticks, you need to first remove the jumper on J14, which is the bottom right of the board. Then, you can wire it into J5 on the left. Note that GND and +5V is shared, so you need to split that. You can’t just leave one analog stick floating if you don’t want to use it, as the signals interfere. I don’t know the resistor value to keep it centered if you just want to put something on it that’s not an analog stick. You can’t pull it to Ground or 5V, as those are the extremes of the range. Dead center would be resistance to get it down to 2.5V.
X/Y are the inputs for the analog sticks (there are two axes/two variable resistors per stick), and the L3/R3 is for the button. I used a breadboard and some dupont wire to split the GND/VCC into two, one for each stick. That’s very brittle and gets loose easily, but my soldering iron is still on backorder, after which I’ll definitely come up with a permanent solution.
Different Modes for different systems
This specific board supports different modes to pretend to be a PS3, PS4, Switch, or XInput stick. Do select a mode, hold one of the buttons when plugging in the stick. I believe that XInput is the default, but I usually use it in PS4 mode which gives access to all features even on Windows.
Modes
1P / Square / X
Playstation 3
2P / Triangle / Y
Playstation 4
3P / R1 / RB
XInput
1K / X / A
Nintendo Switch
Face Button Naming for Consoles
One big annoyance with modern consoles is that they all have different names for their buttons. Between the Xbox, Playstation, and Switch, for example the button labelled X is in three different places. The shoulder buttons are at least named a bit more consistently: R1 on the Playstation, RB on the Xbox, R on the Switch. R2 on the Playstation, RT on the Xbox, ZR on the Switch.
The buttons that I have allow me to remove the top and write on the actual button, which is that I did – top left is Playstation, bottom right is Switch, and the Color coding is for the Xbox, which many Windows games use.
Parts List
The parts list that I used – but see the text on whether I’d recommend them.
Name
Price
Description
Brook PS4+ Fighting Board with Audio
$65
PCB
Brook Fighting Board Cable
$23
Cables to connect PCB to Buttons
Qenker 2 Player LED Arcade DIY Parts
$40
16 large, 4 small buttons, 2 levers - there are many kits like this on Amazon
WMYCONGCONG 10 PCS Game Joystick Breakout Module
$14
10 pack analog sticks on a breakout board
LeMotech ABS Plastic Electrical Project Case, 10.4" x 7.2" x 3.7" (263 x 182 x 95 mm)
$23
Box to put it all in
Dupont Wire, a Breadboard
$10-ish
Connecting the analog sticks
Total
$175-ish
Not counting tools like a drill, step bit, solder iron, pliers etc.
Conclusion
Was it worth it? Probably not, it’s a lot of money for something that’s ultimately worse than a $150 Hori stick.
Was it fun to do? Heck yeah, it was.
Am I going to try it again, with a proper 3D printed case, clean wiring, and better buttons? Probably!
Is this going to help me win at fighting games? Probably not.
One of the best steps a developer (especially in a team or company) can do is to setup a continuous integration solution. Either by running an actual build server (using e.g., Jenkins, TeamCity, Bamboo, Azure DevOps Server (formally Team Foundation Server/TFS), or by using one of the many cloud providers that have sprung up in recent years (Travis CI, CircleCI, Azure DevOps, GitHub Actions).
I maintain a .net Library to create Excel Sheets (Simplexcel), and have used several of these services over the years - from Jenkins to Travis to Azure DevOps to GitHub Actions. And the number one lesson that I learned is... well, the number one lesson would be "You should absolutely use a CI Server, don't just build and publish your code locally". But the number one lesson I've learned from actually using a CI Server is to avoid Vendor lock-in as much as possible.
It's tempting to look at the automation offerings of each platform and create a massive .yaml file with instructions on how to build things and do all sorts of stuff, but if you switch providers, you now basically have to start setting up your builds from scratch. Also, if you do need to do a local build, how would you do that if you depend on the build server to do a bunch of stuff?
In my specific case, I've decided to have an actual build script that runs on PowerShell Core, so it works on Windows, macOS, and Linux. The build script does all the heavy lifting to create an artifact:
Determine version information
Using a base version specified via build_version, and setting a minor revision by counting git commits (so that I'm not depending on some counter maintained by an external service)
Determine if this is a development/pre-release or a production/release build
Update files accordingly if needed (e.g., string-replace version information)
Compile the code (in this case, dotnet restore and dotnet pack)
Run Tests
It's driven by a properties file, but also reads environment variables which can override things.
The advantage is that I can run this locally on my machine, and get the desired artifacts created. But I can also run the same on the build server and have the artifacts created there using the exact same build script.
Run the build script to make sure it compiles on Linux
As part of the build script, run tests
A failed test will fail the build
Get a Windows VM
Checkout the applicable git revision
Run the build script to create the nuget packages and run tests
A failed test will fail the build
If we succeed, push the Nuget Package either to GitHub Packages for development builds, or Nuget.org for production builds.
Now, because this is only a single library and not e.g., a suite of interconnected services that need to be orchestrated and treated as a single unit, the build process is fairly simple.
But it does serve as an illustration on what I try to keep in my vendor-specific build scripts, and that's basically only the things that HAVE to be specific to their environment - if I was to switch from GitHub Actions to another provider, chances are that "runs-on: ubuntu-latest" will not be supported there and I need another magic word to get a Linux VM.
But everything that happens once I have a machine to build on, and my source code checked out should be in an independent build script that I can run locally. This includes Compilation, Tests, but could also extend to things like building a Docker Container (probably using Buildah). Even the publishing of Nuget packages could be in my build script, since it only relies on credentials provided via the environment, but for this I've decided that the .yaml was a good place for it - GitHub's Package Registry is GitHub specific anyway, and for Nuget.org I can just upload a locally built .nupkg via their Web UI.
Build Servers change, and sometimes, your provider shuts down or changes their pricing. Or maybe something new comes along that's better for your circumstances.
You cannot avoid some vendor lock-in, but it's in your own best interest to try to minimize how much vendor-specific functionality you use and how much you can keep generic, runnable on any system.
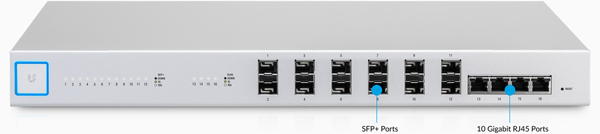
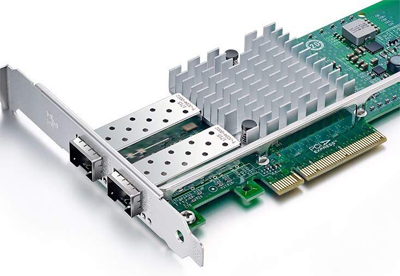
A while ago, I got a Ubiquiti Unifi US-16-XG Switch, which is a 10 Gigabit Ethernet switch with SFP+ and some RJ45 ports. I use Intel X520 PCI Express cards with SFP+ transceivers or DAC cables. That's all good if I have a PC that actually has a free PCIe x4 slot, or an x1 slot that is open at the end to fit a larger card (and take the speed hit due to the lower speed of an x1 port).
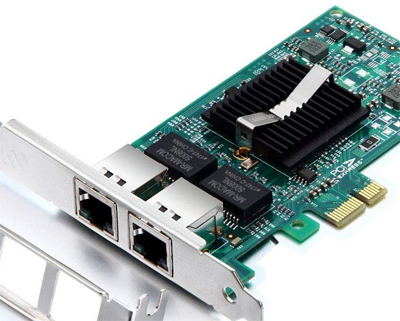
But in my case, I had a mainboard that only had a PCI Express 2.0 x1 slot that was closed, and I needed more than a Gigabit connectivity. One option is to use a card with 2 Gigabit ports and use bonding/trunking/link aggregation, which is fully supported and both my Switch and Linux support LACP/IEEE 802.3ad. But the problem is that even though that would give me a 2 GBit/s total network connection, a single TCP connection cannot exceed 1 GBit/s. Bonding is a way to do load balancing across multiple ports to increase the total bandwidth, but e.g, transferring a file over SMB/CIFS is still limited by the speed of a single port, and that's 1 GBit/s.
Intel 82576 Dual Gigabit NIC
Now, there is a relatively new Ethernet standard, previously called NBASE-T, then standardized in IEEE 802.3bz and resulting in 2.5GBASE-T and 5GBASE-T speeds - that's 2.5 GBit/s and 5 GBit/s. That turned out to be the winner, because while no one makes a 10 GBit/s NIC in x1 size (which wouldn't make sense anyway since 10 GBit/s needs at least PCIe 3.0 x2), there are 2.5 GBit/s cards for PCIe 2.0 x1.
The Hardware
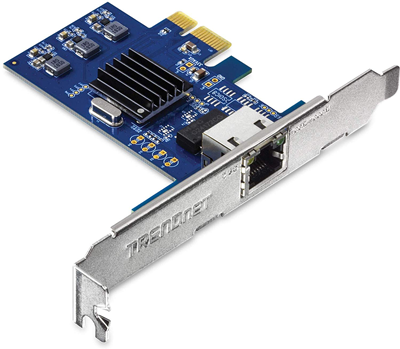
In my specific case, I bought a TRENDnet TEG-25GECTX for about $50, which is based on the Realtek RTL8125 chipset. There are other cards like that on the market, some for about $30, and they all seem to be the same - but the above is the one that I got, and thus the only one I can talk about with authority.
TRENDNet TEG-25GECTX
Only 1 GBit/s on the RJ45 Switch ports 🙁
This solves the PC side of things, but now I need to solve the Switch-side: The US-16-XG can indeed do 2.5 GBit/s - but only on the SFP+ ports, not on the RJ45 ones. Connecting the card to one of the RJ45 Switch ports indeed only negotiated 1 GBit/s - bummer!
So it has to be connected to the SFP+ port, and that means getting a Transceiver. Now, Transceivers exists for 1 GBit/s and 10 GBit/s, not for 2.5 or 5 GBit/s. And as you'd expect, a 1 GBit/s transceiver isn't going to work for 2.5 GBit/s. So I had to buy a 10GBase-T transceiver, which cost another $40 - those things aren't cheap, sadly. I bought a 6COM SFP-10G-T, which was listed as "For Ubiquiti" on Amazon (ASIN B075WR8FHT).
6COM SFP-10G-T 10 Gbit/s SFP+ to RJ45 transceiver
The Switch
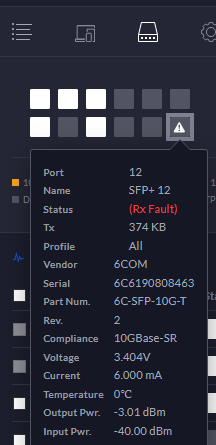
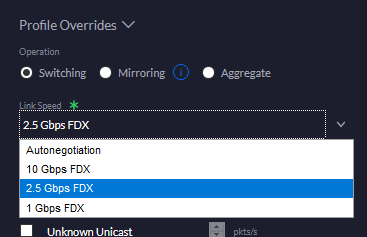
With that, I could connect the card to an SFP+ port on my US-16-XG - and got a link error. That is to be expected since the Transceiver is 10 GBit/s, the Switch is 10 GBit/s, and the card can't do 10 GBit/s. The final piece of the puzzle was to configure the Switch to 2.5 GBit FDX instead of autonegotiation.
Transceiver is detected, but can't establish a 10 GBit/s link with the NIC - as expected.
"Technology should Be Your Servant, Not Your Master" - Ludovic Tendron, The Master Key
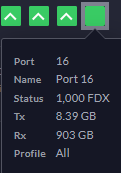
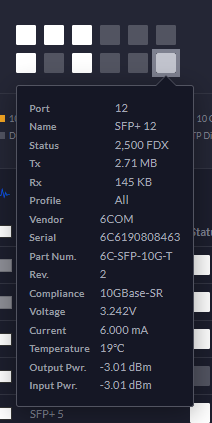
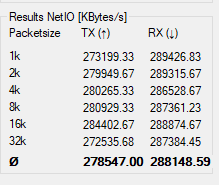
With that out of the way, everything just started working, and I'm indeed seeing 2.5 GBit/s performance from host-to-host. I'm making a note here: HUGE SUCCESS.
Note that 2.5 GBit/s shows up as light gray instead of White in the Unifi Controller UI.
Light gray means good.
The Operating System
I am using Ubuntu Server 18.04 LTS, which doesn't have a driver for the Realtek 8125 built-in, and thus the card doesn't show up (this is true as of 4.15.0-88-generic #88-Ubuntu SMP Tue Feb 11 20:11:34 UTC 2020 x86_64, which is the latest as of this post).
I had to install and update using the built-in Gigabit NIC, then download the driver from Realtek (2.5G Ethernet LINUX driver r8125 for kernel up to 4.15). Someone seems to have mirrored it to GitHub, but I haven't tried that and downloaded directly from Realtek.
I had to apt-get install build-essential to get build tools installed, then a simple ./autorun.sh in the extracted driver directory compiled and installed it. After a reboot, the card was found and connected perfectly fine.
lsmod or lspci -nnk shows the driver module as r8125, and it's located in /lib/modules/4.15.0-88-generic/kernel/drivers/net/ethernet/realtek/r8125.ko to match my kernel version. I assume I'll have to recompile it after kernel updates, but as none was released yet, I don't know for sure.
I'm using netplan, and to make sure I can connect either NIC (but don't stall the bootup process if one isn't connected), I've marked both as optional. I've also match them based on their driver as in my case, both the onboard and 2.5 GBit/s NIC use different drivers, so this works fine and I don't have to worry about device names changing.
The numbers don't lie, and these numbers say that I'm getting ~275 MB/s (out of a theoretical maximum of 312.5 MB/s) from one host to the PC - so yeah, full on success here.
Is it worth spending $80 on such a solution? I'd recommend going with a 10 GBit NIC whenever possible, even if you have to stick it into an x1 slot (assuming the slot is open, so that it physically fits) - it's about the same price, and is much more futureproof.
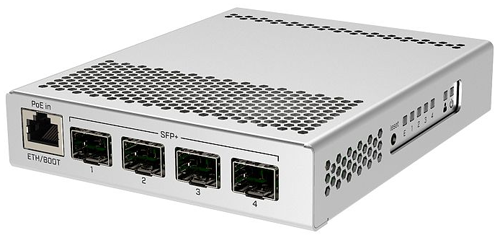
And even if you're not on 10 GBit/s and want to go faster than 1 GBit/s, you can get some really well priced Microtik switches, like the $130 CRS305-1G-4S+IN. And you don't need expensive Fiber transceivers, because for short connections (up to 7 Meters) there are DAC cables, which are copper cables with SFP+ connections.
There is financial benefit from staying with a copper-based solution (and you might already have all the cabling in place), and 2.5 GBit is cheaper than 10 GBit for sure. Besides, 250 MB/s is plenty fast for most home networks. But that said, I'd still go for 10 GBit/s, which can be done over regular Ethernet cables assuming they are high enough quality.
The 2.5 GBit/s solution helped me here for one machine that didn't have a slot suitable for a 10 GBit/s card, but that's pretty much the only reason I'd go with that speed.
Microtik CRS305-1G-4S+IN switch with 4x 10 GBit/s SFP+ and 1x Gigabit RJ45
10G SFP+ DAC Cable / 10GBase-CU Up to 7 meters, cheaper than even just one transceiver
Most ATX Mainboards have somewhere between 3 and 5 PCI Express slots. Generally, an x16, x8 and some x1's, but if you have e.g., a Threadripper X399 board you might have several x8 and x16 slots.
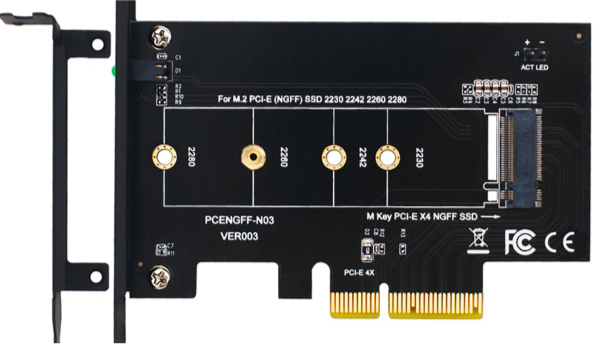
But what if you want more devices than you have slots? Let's say you want a whole bunch of M.2 NVMe drives, which are only x4 each. Ignoring any motherboard M.2 slots, you can use adapter cards that just adapt the different slots:
But now you're wasting an entire x16 slot for just one x4 card. Worse, if you're out of x16/x8 slots and have to use a x1 slot, you're not running at proper speeds. And what's the point of having 64 PCI Express Lanes on a Threadripper CPU if you can't connect a ton of devices at full speed to it?
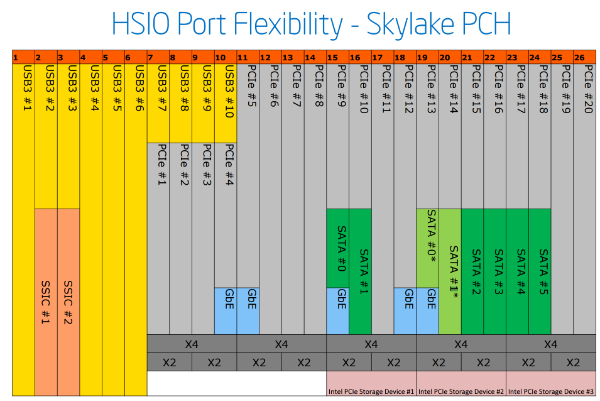
The thing is that PCI Express lanes can be combined in different ways. If a CPU has 16 PCI Express lanes, a mainboard manufacturer could in theory put 16 x1 Slots on the board (like some mining boards), or 1 x16 slot. There are some limitations, and chipsets offer their own additional PCI Express lanes. See for example this diagram from Anandtech/Intel:
So, to circle back to the topic: Can we just connect more than one device to a PCI Express slot? After all, treating a PCI Express x16 slot as 4 individual x4 slots would solve the NVMe problem, as this would allow 4 NVMe on a single x16 slot with no speed penalty.
And it turns out, this option exists. Actually, there are multiple options.
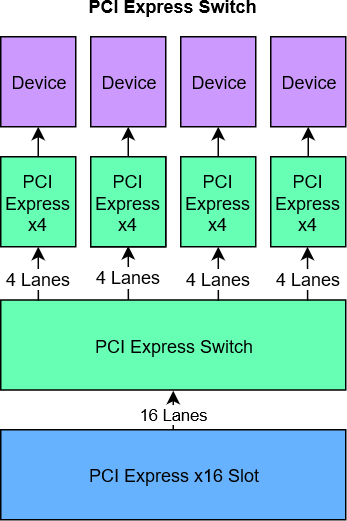
Using a PCI Express Switch
Like a Network Switch, a PCI Express Switch connects multiple PCI Express devices to a shared bus. A popular example is the ASM2824.
The advantage of a PCI Express Switch is that it's compatible with pretty much any mainboard and are thus a great option - if it weren't for the price. A Quad NVMe card with a PCI Express Switch costs around $200 at the moment.
I do not know if there are any performance deficits, though assuming you're using a PCI Express x16 slot, you should be fine. It should be possible to use these cards in x8, x4, and even x1 slots, though of course now your 16 NVMe lanes have to go through the bottleneck that's the slot.
Verb bifurcate (third-person singular simple present bifurcates, present participle bifurcating, simple past and past participle bifurcated)
(intransitive) To divide or fork into two channels or branches. (transitive) To cause to bifurcate.
Synonyms branch, fork
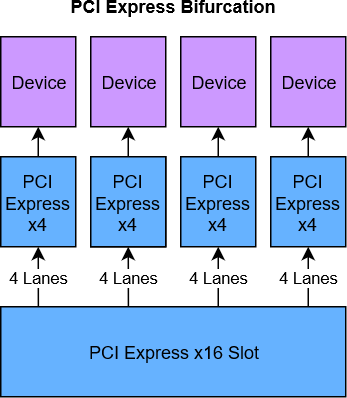
Bifurcation is the act in which you take 4 lanes of an x16 slot and turn them into a separate x4 slot, then take another 4 lanes and turn it into another x4 slot, etc.
Look ma, no bridge!
In theory, you would be able to split an x16 slot into 16 individual x1 slots, or into 1x4, 1x8, and 4x1 though I'm not aware of any mainboard that supports this.
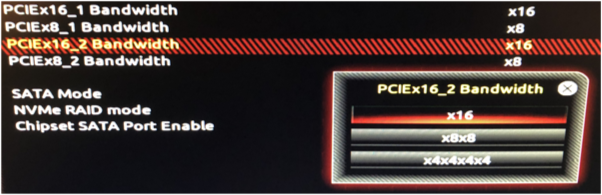
And that's the important part here: The mainboard needs to support this. There would need to be an option somewhere to tell the mainboard how to bifurcate the slot. Here's an example from the BIOS of the X399 AORUS Pro:
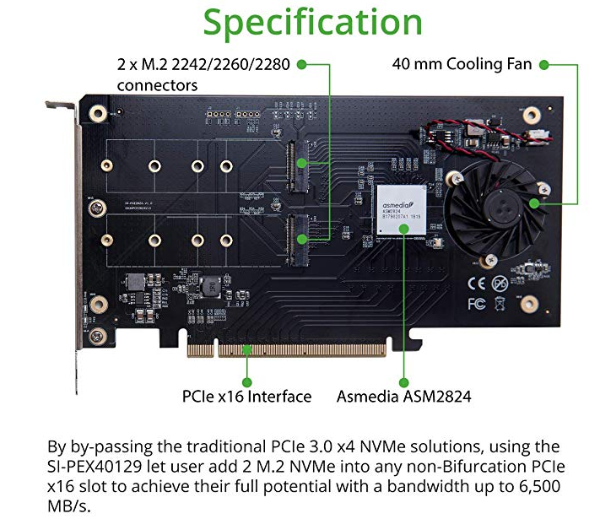
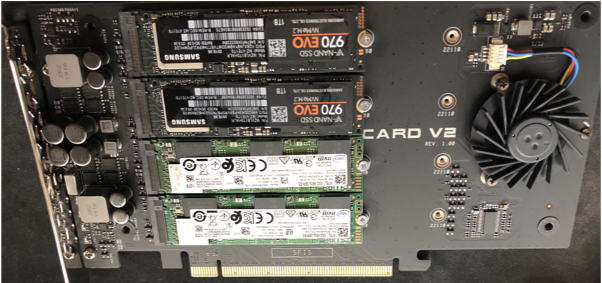
This board offers to bifurcate an x16 slot into either 1x16, 2x8, or 4x4. For x8 slots, I can choose 1x8 or 2x4. With this, I can use a card like the ASUS Hyper M.2 X16 Card V2, which is basically 4 of those NVMe-PCI-Express cards on one PCB.
In comparison to the $199 card above, this Quad NVMe adapter costs $55 at the time of writing.
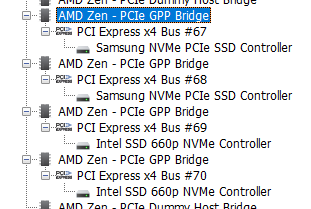
The card itself has some electronics on it for power regulation, fan control and the like, but no PCI Express Bridge. The system gets presented with 4 individual PCI Express x4 buses.
Individual PCI Express x4 Buses
It's important that bifurcation does not "add" PCI Express lanes like a Switch could - you can't bifurcate an x8 slot into 4x4 slots, and using the above card in such an x8 slot will only show one or two drives (if using x8 or x4x4) mode.
Bifurcation is not usually supported in "consumer" platforms, mainly because there aren't a lot of PCI Express lanes on most CPUs. Intel's flagship Core i9-9900K CPU has 16 total lanes. Sixteen. Total. AMD is a bit more generous on their Ryzen CPUs, offering 24 Lanes (Fewer on APUs). Now, some of those lanes are connected to the Chipset to provide things like SATA, USB, OnBoard Sound and Networking. With your graphics card (likely x16), an NVMe boot SSD (x4), you're already somewhere in the realm of 28 PCI Express lanes, though of course because they don't always use the full bandwidth, the PCI Express Switch in the CPU can handle this without performance loss.
But still, with so few lanes, Birfurcation doesn't make sense. It does come into play on HEDT Platforms however. AMD's Threadripper boasts 64 PCI Express Lanes, while EPYC has 128 of them. Intel's product lineup is a bit more segregated, with their LGA 2066 platform offering 16, 28, 44, or 48 lanes. Cascade Lake-W offers 64 PCI Express Lanes.
HEDT - more than just more Cores
With AMD now offering 16 Cores at 3.5 GHz in their Ryzen 9 3950X, and Intel bringing the Core i9-9900K to the LGA1151v3 platform, there is a question whether LGA 2066 and Threadripper still make sense. Why pay so much more money on the CPU and Mainboard?
However, as important as Core Count/Speed is in many cases, if you're building a fast storage server with SSD/NVMe Storage and up to 100 Gigabit Ethernet, you need those extra PCI Express lanes.
Four NVMe drives is already 16 PCIe 3.0 Lanes, a single 10 Gigabit Ethernet port would require 2 more PCIe 3.0 Lanes and the chipset also usually takes 4 lanes for its stuff, bringing the total to 22. So you're already scraping the limit of Ryzen Desktop CPUs, without much room for additional growth. SATA and USB are part of the Chipset, but if you want SAS Drives, more/faster network ports, a graphics card, additional NVMe storage - you're back in the land of PCI Express Switches and compromising on bandwidth.
As said before, currently there is an actual choice of CPUs for different use cases. Do you want more cores, or faster cores? Two, Four, Six, or Eight memory channels? NVMe storage and/or RAID? A bleeding edge platform, or one that's around for years but likely on its way out soon?
After a decade of stagnation, Building PCs is fun again!
When I started working at Stack Overflow back in 2016, I got a Dell XPS 15 9550, along with a TB16 Thunderbolt Dock. This setup served me well, especially after upgrading the SSD to a 1 TB Samsung 960 Pro. However, all good things must come to an end, and in my case, it was the TB16 Dock that just died after 2 years of near constant usage. Since the Laptop is still doing well, getting a new TB16 or a WD19TB would have been an option.
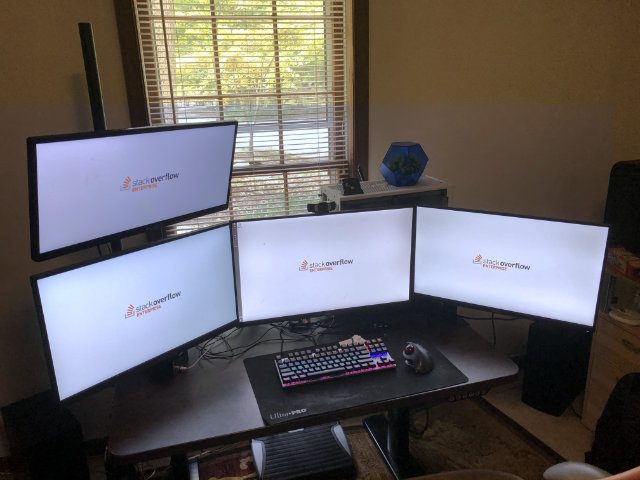
But technology has advanced, and the time to recompile and start the Stack Overflow application pool was almost 2 minutes - not terrible, but when switching branches a lot, it's easy to lose focus when compiling a few times in a row. Also, I'm running 4 monitors, and that required a separate USB Graphics card alongside the dock. A hardware refresh was overdue anyway, and so I looked at Nick Craver's Desktop Build and made a few adjustments.
Here's the list, then I'm diving into the reasoning:
When building a PC, the biggest choice these days is the CPU. Thanks to AMD's phenomenal comeback with their Ryzen CPUs, we got some real competition going on, and are thus really spoiled for choice. There isn't really a bad choice, though it can feel like there are.
There is also Intel's HEDT Platform (LGA-2066), but I can't think of a reason to choose that one over one of the three above. If you feel that you want the extra cores and decide against Threadripper or Ryzen 9, at least wait for Cascade Lake Xeon-W's.
My toolset mainly consists of Visual Studio 2019, IIS, SQL Server 2017, Redis, Elasticsearch. Even though Visual Studio is externalizing a lot of tooling, Single-Threaded performance still matters a lot, and there's not too much use for higher core counts. So Threadripper isn't really worth the extra expense, since there is simply not enough I/O going to to justify that amount of parallelization. If your environment benefits from parallelization and wants Cores, Cores, and more Cores, then obviously my observations don't apply.
Anandtech just did their Review on Ryzen 3xxx, though unfortunately it doesn't include the Chromium compile benchmark that they used to have. Still, looking at the 9900K compared to the 2nd Gen Threadripper and Zen+ Ryzen 2xxx, it's clear that for this workload, the 9900K shines and is overall the best single-thread CPU on the market right now. Cache Latency is also a bit better, though I doubt it makes much of a difference.
But AMD's Zen 2 is right there up with it. The 12c/24t Ryzen 9 3900X costs the same as the i9-9900K, and the Ryzen 7 3700X is the absolute price/performance king right now, with 8c/16t and a suitable cooler for $329. There are some initial BIOS Bugs and other early adopter issues, but just like the original Ryzen and Threadripper, I have 0 concerns that those will be resolved by the end of the year.
There's really not too much of a wrong choice here: I believe that the Core i9-9900K is the best overall Desktop CPU right now, but it's about $500 without a cooler and gets crazy hot (though that's because it's unlocked and runs at 4.7 GHz on all Cores by default).
The Core i7-9700K lacks Hyper-Threading, but is about $100 cheaper. The Ryzen 9 3900X is a serious contender for best overall CPU, and the Ryzen 7 3700X might just be the best bang for the buck. Heck, even if you buy a Core i5-9400F for $150 or so, you're getting an excellent CPU.
You might get some good deals on the older Ryzen 7 2700X or Core i7-8700K, but I feel that paying a little bit extra for Zen 2/Coffee Lake 9th Gen is worth it.
FWIW, a complete rebuild and application pool startup takes about ~45 seconds now, down from ~120 seconds. So I'm really happy with this upgrade.
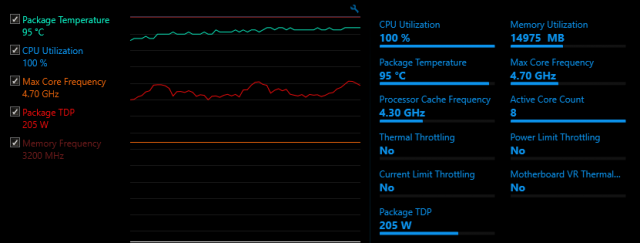
95W TDP? Yeah, I guess you could run it that way, but where's the fun in limiting the power?
Noctua NH-D15 Cooler
The Core i9-9900K is specified as 3.6 GHz Base Frequency at 95W TDP, but that's really not how you want to run it. Most BIOSes let it run unbounded, as fast as possible by taking in as much Power as possible. And that power generates a lot of heat that needs to be dissipated. Most of the time, the CPU is running within reason (~30-40W), and even when compiling it only spikes up to ~110W briefly. Mainly because compiling .net Code is still not using all the cores, and because it's just not running long enough anyway.
However, it is possible to hit higher TDPs (I think 225W is a good estimate for a cooling system), and you don't want to pair a $500 CPU with a $10 OEM Cooler. Unlike the 8th Generation Coffee Lake, the 9th Generation doesn't need to be delidded to get acceptable cooling, although it might help - I didn't bother, I just want it to run stable with little hassle.
One very popular option are All-in-One (AiO) Water Coolers, like the Corsair H150i or (for smaller cases), the H115i. These are both excellent choices, but Noctua's NH-D15 is mostly up to par with most AiO's. It's probably the best air cooler on the market, along with the beQuiet's Dark Rock Pro 4 (performance is very similar).
The advantage of an air cooler is that it's less maintenance, but at the cost of a huge footprint. The NH-D15 can be rotated 90 degrees and the fans can be mounted on either side of each tower in any orientation (push/pull), but you still need to be aware of RAM clearance and case size. An AiO gives you more flexibility.
The best option of course is a custom loop, but that's not exactly plug and play and thus left for people with more desire to squeeze out every last inch of performance. The NH-D15 is relatively easy to install for how big it is, quiet unless needing to deal with 200W TDP, and the cooling performance is awesome.
Gigabyte Z390 AORUS Ultra Mainboard
With the i9-9900K, the motherboard matters a lot. Specifically, you want a Mainboard with VRMs that can handle the TDP unless you like throttling. There is a list of Z390 Mainboard VRMs on the internet, and from running another 9900K on an ASRock Z390M Pro4 I can attest that throttling due to VRMs is a thing.
The Z390 AORUS Ultra has a great VRM Setup, one that's also shared by the Z390 AORUS Pro/Pro Wifi. Apparently, the Z370 AORUS wasn't that great, but I have no experience with that one.
Other than that, it's just a nice board. Integrated I/O-Shield, which should really be the standard for all boards, so nice. M.2 Slots with heatsinks, Diagnostic Numeric LED display, built-in ac WiFi and Bluetooth 5.0.
It's not as expensive as the high end boards (like the various ASUS Maximus XI), though it is more expensive than the lower end boards.
As to whether you need a Z390 or could go with a Z370 or B360 - no opinion, really. Z390 Boards will have a BIOS that's compatible with 9th Generation Coffee Lake, no need to maybe get an older CPU to upgrade the BIOS or something like that. And since the 9900K is unlocked and meant to run at turbo speed, it makes sense to use a high-end chipset.
2x16 GB Corsair Vengeance LPX DDR4-3200 CL15
Nothing too exciting about the memory. 2 modules because of Dual Channel. The 9900K supports 128 GB RAM when using 4x32 GB Modules, but even with VMs, I don't need that much memory on my Developer Workstation. 32 GB is plenty, and I have an easy upgrade path to 64 or 96 GB by just adding another 12 or 32 GB pair. (It's possible to mix 2x16 and 2x32 GB RAM and still mostly retain dual channel, as long as each memory channel has the same capacity, 48 GB).
The 9900K supports DDR4-2666 RAM and I don't plan on overclocking (stability is #1 priority), so technically it's overkill to go with DDR4-3200 RAM. But the price difference was negligible, and if I upgrade to a CPU that does DDR4-2933 or DDR4-3200, I can still use this RAM.
1 TB Samsung 970 Evo Plus
Of course, a SSD is a must, and a PCI Express 3.0 x4 NVMe SSD is definitely much preferable to a SATA SSD. I only really need 1 TB, and no need for a separate OS/Data disk. The Samsung 970 Pro would be the best choice, but the price difference is pretty significant. The 970 Evo Plus offers an excellent price/performance ratio, comes with 5 years warranty, is rated for 600 TB writes, and ridiculously fast.
Corsair HX750 80 Plus Platinum Power Supply
Regardless if you're building a $200 or $2000 PC, you don't want to get a crap power supply. Technically, 750W is way more than what I need (~500W would be closer to my need), but most of the better power supplies start at 650 or 700 Watts.
The HX750 is modular, which is nice for a computer that basically has nothing in it - it's all on the motherboard, plus the graphics card power. No other peripherals and the like. It's also 80 Plus Platinum, which is definitely good on a system that runs for 8 hours a day. And 10 years warranty is a nice extra.
The Carbide is a nice looking case, has an acrylic window (finding a nice case that supports full size ATX boards, doesn't have a window at all, and isn't ridiculously expensive is really hard these days), and the white color is a nice change from the default black. It also comes with 2x 120mm fans already and has space to add more, and doesn't break the bank.
It's a good case, though I'm sure there are others as well. It's a matter of personal choice, even a $20 case will do if it has the means to give proper airflow and space for your peripherals.
Noctua NF-S12A PWM Case Fan
As said, the case already came with 2x 120mm fans, and the NH-D15 CPU Cooler comes with 2x 140mm fans. The additional case fan is just there to get out more air.
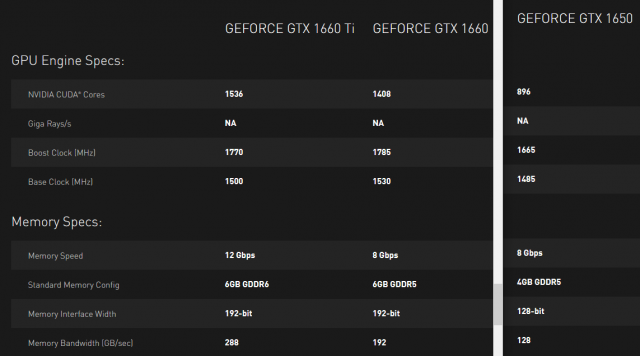
Geforce GTX 1660 Graphics Card
This is not a gaming PC, so I mainly need something to drive my monitors directly, without any need for Docks or USB Graphics cards. Now, Stack Overflow uses CUDA for the Tag Engine, but here I don't need as much CUDA Performance as some of the smarter developers dealing with Stackoverflow.com's scale.
The Geforce GTX 1600 series is basically an RTX 2xxx without the Ray Tracing, but otherwise the same Turing architecture at a much lower price. The 1660 is quite a bit faster than the even cheaper 1650, and not significantly slower than the 1660 Ti. So it's ideal for my use case.
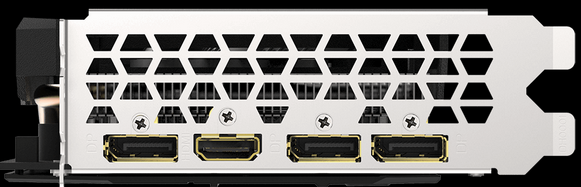
It supports 4 monitors, three with DisplayPort 1.4a and 1 with HDMI 2.0b. So no problem connecting all four monitors at their native resolution (and even 4K @ 60 Hz wouldn't be an issue). The specific model doesn't really matter, as I don't care about extra overclocking or game bundles and the like.
Geforce GTX 1650, 1660, and 1660 Ti Specs
Connectors: 3x DisplayPort 1.4a, 1x HDMI 2.0b
Monitors
Two monitors is the minimum for any office work in my opinion, but there is so much going on that more can be useful.
I have one monitor for Visual Studio and any panels/debug tools etc. The second monitor is the web application I'm working with, including stuff like the Firefox developer tool pane. The third monitor is for email/calendar/chat/sticky notes - just stuff I want to be aware of without having to constantly switch to it. And the fourth monitor is for misc. stuff like graphs, research notes/web pages. and just other stuff I need and don't want to switch away from my Visual Studio from.
As for the resolution, I don't like 4K. It's too small, even on 30+ inch monitors. I could use Display Scaling, but it still sucks on Windows. Yes, it's much, MUCH better in latest Windows 10 than what it used to be in older versions, but really, the only operating system that does display scaling properly is macOS.
For me, 2560x1440 on a 25" or larger screen is perfect. Enough pixels to actually put stuff without having to constantly switch, and large enough to actually see stuff without needing to zoom.
My two Dell Monitors were purchased with my Laptop in Mid-2016, while the BenQ PD2500Q was purchased in Mid-2018. These are excellent monitors, with DisplayPort support, daisy chaining support (though not needed anymore), built-in USB Hubs, IPS Displays, relatively small bezels, VESA mount compatibility - and importantly, 2560x1440 Pixels resolution.
The LG Ultrawide was one that I had lying around. Nothing special about it, apart from its 2560x1080 resolution (the 21:9 version of 1920x1080).
At the end, Monitors are also a matter of preference, though if you see one of those cheap TN-panel monitors, leave them. IPS is the way to go, and I think they are some newer technologies that are based on it.
Various VESA Mounting Arms
Ergonomics are important. And while there are differences in monitor stands - tilting, height adjustment, rotation are not always supported, I found that monitor arms are the way to go. You get all the adjustments that you want, and you save space on the desk as the monitors are floating.
It's an extra investment (good monitor arms can cost $100 for 2 monitors), but I use them for both my home and work PC and don't want to go back to plain regular stands.
VESA Certified Display Port 1.4/HBR3 cables
Normally, cables aren't brought up in posts like these. Just grab some cheap ones from Amazon or Monoprice or wherever and it's good. And I'm not here to advocate for some ridiculous, oxygen-infused, blessed-by-a-priest, $100 cables.
But I did have some issues with the picture sometimes blacking out for a second on resolutions above 1080P, though it's perfectly possible for this to be an early sign of the TB16 dock dying.
So to be on the safe side, I got certified cables (made by Club3D) with HBR3 bandwidth. That's technically overkill since HBR3 supports 1440P@240Hz, 4K@120Hz, 5K@60Hz and 8K@30Hz, and I just need 1440P@60Hz. But the cables aren't that much more expensive than cheap-o no-name stuff ($15 per 3ft cable), and it's one less thing to worry about if I upgrade in the future.
CyberPower CP685AVRG UPS
Having a Surge Protector is generally seen as a good idea in any household. But the idea of a personal UPS for a Desktop PC still seems like a novelty. It's worth it though.
If your power goes out for just a few seconds, your PC will still go out. Or even worse: It will stay on because of charge in the capacitors, but some component might've been getting too little juice and now misbehaves. If your power goes out for a few seconds or minutes, no big deal, the UPS just handles that. And for longer outages, you can at least save your work and safely shut down your PC.
Personal UPS are neither big nor expensive, this specific one is like a fat power strip. It does have a USB Port so you can see your power consumption. And it surge protects your cable modem as well.
Yes, you're dealing with a Lead-Acid battery that will eventually need to be replaced/disposed. But with a 3 year warranty and the ability to drop off batteries like that in many places, you should really spend the $70 or so for a UPS.
This is mostly a personal, choice, but switching to a Trackball was a great choice. I first used the Logitech M570 which is both cheap and excellent, and I still use it for my personal computer.
For my work PC, I bought the MX Ergo, which supports Bluetooth (The M570 uses the custom Logitech receiver), is a bit more angled for additional support and less angling of the wrist. Just like the M570, the battery lasts forever, and it does need the occasional clean since even though the ball is being read optically, dust still gets into the roller and might make the ball not roll smoothly. But that's like, once a month or so, nothing like the old ball mice that needed to be cleaned several times a week.
The MX Ergo is not cheap and may not be worth the extra money over the M570, but in either case, both are absolutely excellent devices and have replaced mice on both my home and work PC, except for some twitchy games where I still plug in a mouse.
These are trackballs that are controlled with the thumb, but there are also ones that you control with your fingers. The Logitech Trackman Marble is a classic and pretty cheap, but the lack of a mouse wheel annoys me to no end. Amazon sells the Elecom M-DT2URBK for the same price, which has a wheel. There used to be the Microsoft Trackball Explorer, but that one is out of production forever and really expensive if you find one.
Another ergonomic alternative are vertical mice. I have the Anker and it's an excellent mouse. I did not try the Logitech MX Vertical Mouse, though from Reviews, I'm not sure if it's really better.
But in either case, it's worth trying out ergonomic options, and both the Logitech M570 Trackball and the Anker vertical mouse are cheap enough to just try out and see if you like it.
I have been through many different ways to manage development of software during my career. I have cowboy coded and ninja-deployed. I have had months of research and spec writing. I have had 2, 3, 4 and 5 week sprints. I have had daily standups at the beginning of the day, at the end of the day, once a week, once a month. I had retrospectives at the end of a sprint, at the end of a month, at the end of a quarter, at the end of a feature, at the end of a release. I have estimated in days, story points, US Dollars, T-Shirt sizes. I have done Waterfall, Kanban, Scrum, Lean, XP, Waterboarding. I think I've even been a Rockstar developer once, by which I mean that I threw up after drinking too much and speaking sim-lish.
In short: If you can imagine a way to develop software, I've likely experienced it first hand. And I am still astounded how much the term "Agile" (not to be confused with the similar Italian word) gets abused. So please, let me start by giving the complete, unabridged, definitive definition of Agile Development:
We are uncovering better ways of developing software by doing it and helping others do it. Through this work we have come to value:
Individuals and interactions over processes and tools Working software over comprehensive documentation Customer collaboration over contract negotiation Responding to change over following a plan
That is, while there is value in the items on the right, we value the items on the left more.
This is it. This is the entirety of the Agile Manifesto. And yet, this short, 4-clause manifesto has spawned thousands and thousands of pages of written books, coaching and courses, a plethora of new vocabulary, and of course, certifications and TLA galore. PMI-ACP, CSM, CSPO, CSD, CSP, PSM, PSPO, PSD-I, SAFe, MFG, OMGWTFBBQGTFO, Six Sigma.
Now, this stuff is good for the job market. A lot of Project/Product/Program Managers (or "Producers" in the Entertainment industry - but if you ask 10 people what that term actually means, you get 15 different answers) managed to make a career out of this, and I'm not against that. Technology is changing really fast, and that affects non-developers as well.
But it also causes a paradox: Too many times, it leads to an attempt to force "Agile Development" to follow extremely specific, narrow rules. Otherwise, you are doing it "wrong". The counter-argument to this is of course that not having any rules means that you're just winging it.
The point about Agile Development - and software development in general - is that you need to figure out what works for your team and your kind of work. Are you writing software for government/medical/military use? There's gonna be waterfall-levels of spec writing involved, no way around that. But you can still split out features that are specced, develop them in sprints and regularly check with the customer. Are you a startup that's sustained on Ramen, a shoestring budget that doesn't have any room to actually buy shoestrings? Just hacking stuff together and deploying it 73 times an hour might be A-OK. Are you writing corporate software that requires early heads-up? Having monthly or quarterly releases and doing "3 week waterfalls" is an option.
The two worst ways I've seen software development handled is trying to conform to very strict rules that clearly don't work for the kind of work you're doing, and just constantly changing the process under the guise of making adjustments, but really just hoping that something just magically works.
But there's no silver bullet, and there's really no way around for the person or people in charge of the team/process to understand software development to the point of making educated adjustments. If your process isn't working - why is that? That's a tricky question to answer, and often one that stays unanswered as random adjustments are made.
Figure out if it's a problem with your customer interaction (More/Less frequent reviews? Involvement in the sprint planning or not? Approving every change before even starting real work on it, or making decisions and asking for approval during the process?), if it's a problem with your team structure (Too few developers doing too many features at once? Too many developers working on one feature? Skill sets not matching up with tasks?), if it's a problem with your decision making process (Does it take 3 weeks to even get a meeting about whether the button should be on the left or right of the form, without even making a decision? Unless that button is the "Test Missile Alert" button, you should probably look at a faster way to make decisions.) Do you have one super-urgent "do or die" feature that needs to go in NOW? Abandon parts of the process that stand in the way of implementing the feature.
Everything is a tool. While it's perfectly possible to make a career without knowing the tools available to you, it's worth learning the pros/cons/strengths/weaknesses of each available tool. That book or certification you got? It's a tool to put on your CV to land a job, but it's also a way to learn more about tools.
I have a little home file server, which is filled with several hard disks in Mirrored Windows Storage Spaces arrays. While Mirrors/RAID-1 isn't backup (won't help with Ransomware, viruses, accidential deletion), it gives me a bit more peace of mind.
Now, because of how little space is in the case, I filled it with 6 regular hard drives for Data and 2 PCI Express x4 NVMe drives in slots, which left no real space for an OS Drive. I knew that I could cram a 2.5" SSD in there, which meant no mirroring for the OS drive.
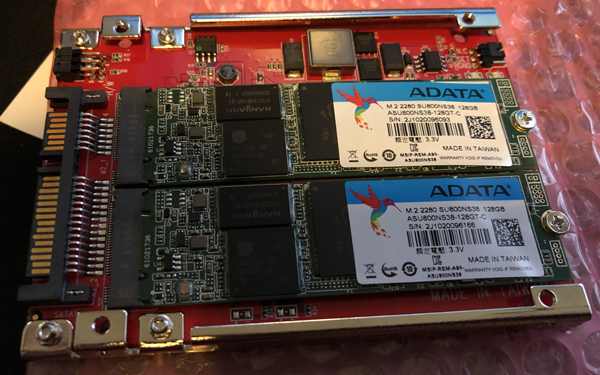
After some research, I found exactly what I wanted: An adapter that takes 2x M.2 SATA Drives, does RAID-1 in hardware, and makes them look like a regular 2.5" SSD. (Amazon.com article B076S9VK1M, StarTech.com M.2 to SATA Adapter - Dual Slot - for 2.5in Drive Bay - RAID, $44). The manual calls it S322M225R.
I got 2 128GB AData SU800 (ASU800NS38-128GT-C) drives with it, which are cheap TLC drives that still have a DRAM Cache so they aren't terribly slow. Important: You need to make sure that you use SATA M.2 drives, not PCI Express/NVMe ones. They are keyed slightly differently, but look otherwise identical. Check the description of whatever drive you want to use.
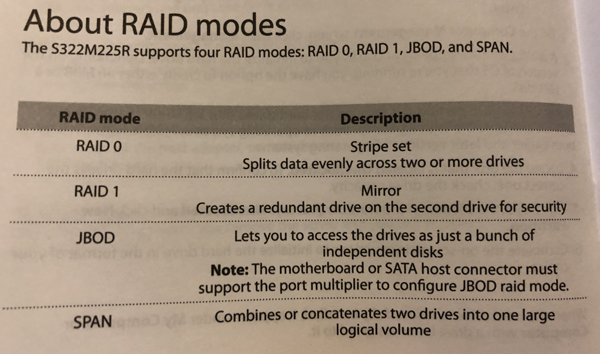
The adapter supports for modes: RAID-0, RAID-1, Span, and JBOD. JBOD requires that your SATA Port supports port multipliers, because it will see two individual hard drives. RAID-0 and Spanning are modes in which one failure causes data loss of both drives, so I don't care about that mode at all.
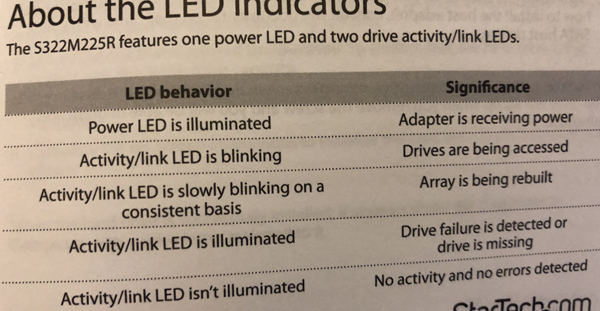
There are also 3 LEDs on the adapter: Power, and Activity for Drive 1 and 2.
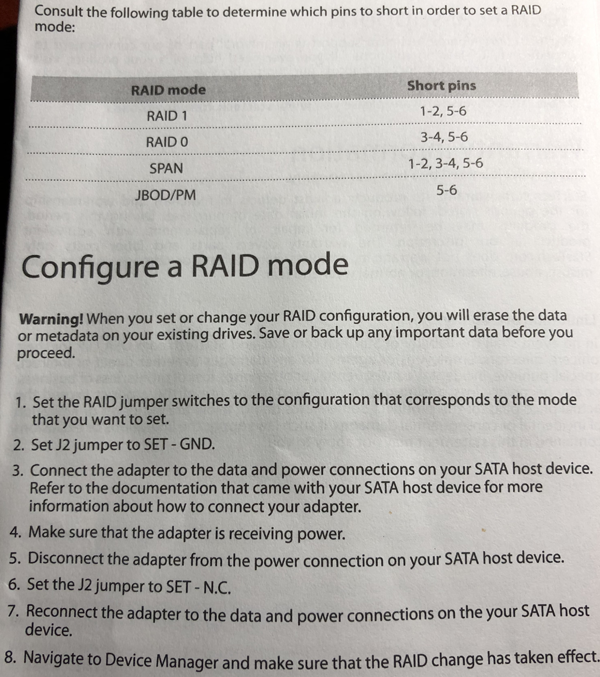
You set the desired mode using three jumpers. You need to set another jumper (J2), power on the device to set the RAID mode, then power off and unset the jumper to use the drive.
Jumper Settings for Modes
The drive shows up as ASMT109x- Safe, with the capacity of 128 GB. The first boot up is pretty slow, I assume the drive blocks while it initializes the drives. Further reboots are as fast as normal. The drive shows up like a regular single 128 GB drive and can be partitioned and formatted as normal.
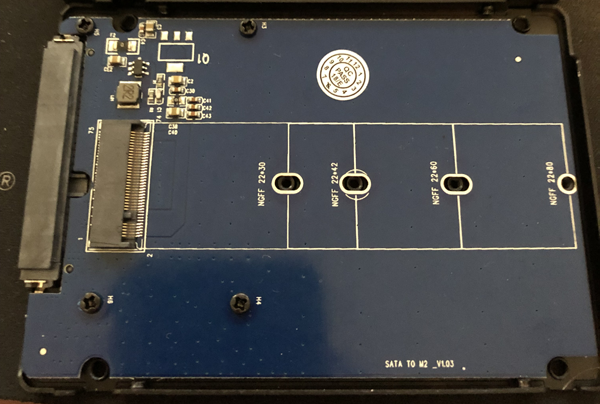
To make sure that the mirroring works, I put each drive into a simple M.2 SATA Adapter and verified that the data shows up on both. I then made a few changes to the data to test rebuilding.
Using a second, simple M.2 SATA Adapter to verify that I can read the data
The good news: Mirroring worked fine, I could mount each disk individually and access the data. After plugging the drives back into the RAID Adapter, and the mirror was rebuilt.
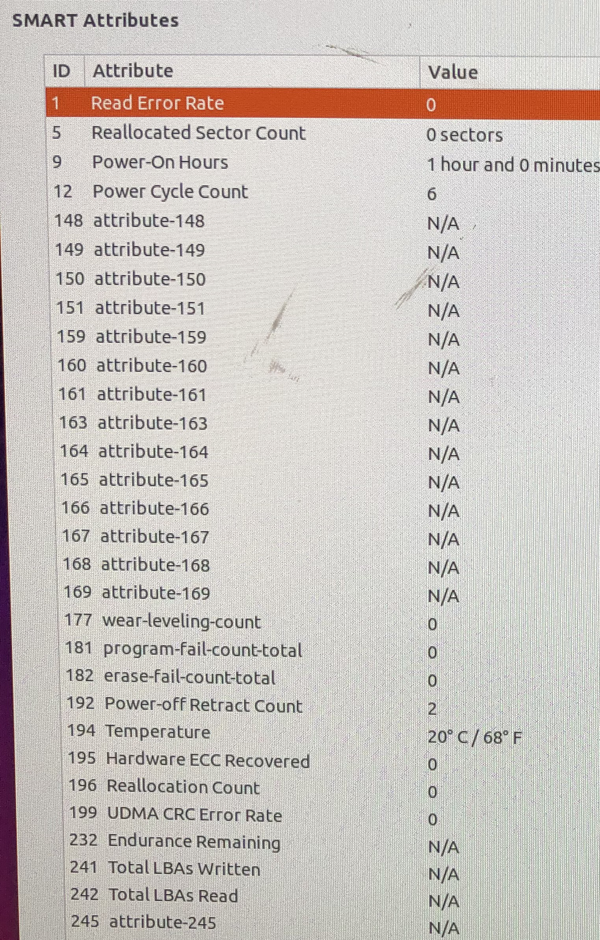
The bad news: There was no indication that the array failed when I removed one drive. SMART still says that everything is OK. The manual says that a permanently lit LED indicates failure. I'll have another look at the SMART Data over time to see if there is a way to detect disk failure.
Overall, the adapter does what it's supposed to do, so that's great. I dislike that there seems to be no software-detectable way to see when a drive fails, which limits use in more critical environments. But as a way to safe me some time rebuilding the OS in case a drive dies, it does what I want.
Here are some more pictures of the manual and usage:
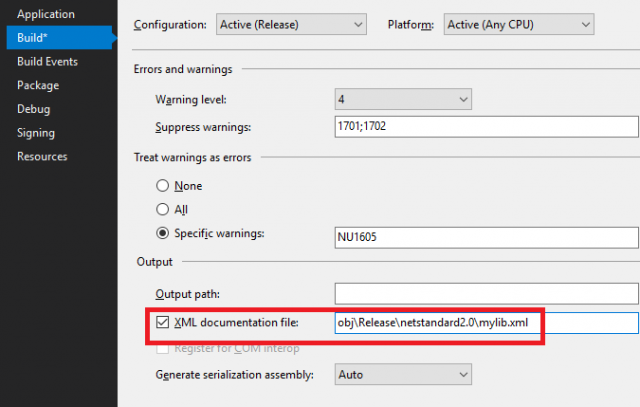
One of the nice things about .net is that you can automatically generate an .xml file for the xmldoc comments.
One of the worst things however is that by default, this leads to compiler warnings (and, in case "warnings as errors is enabled" - as it should be - leads to a failed compilation).
1>FooWrapper.cs(5,18,5,28): warning CS1591: Missing XML comment for publicly visible type or member 'FooWrapper'
1>FooWrapper.cs(7,21,7,24): warning CS1591: Missing XML comment for publicly visible type or member 'FooWrapper.Foo'
1>FooWrapper.cs(9,16,9,26): warning CS1591: Missing XML comment for publicly visible type or member 'FooWrapper.FooWrapper()'
1>FooWrapper.cs(14,16,14,26): warning CS1591: Missing XML comment for publicly visible type or member 'FooWrapper.FooWrapper(bool)'
1>FooWrapper.cs(19,32,19,39): warning CS1591: Missing XML comment for publicly visible type or member 'FooWrapper.Dispose(bool)'
1>FooWrapper.cs(23,21,23,28): warning CS1591: Missing XML comment for publicly visible type or member 'FooWrapper.Dispose()'
This often leads to the desire to add comments to everything, possibly even using automated tools, which results in a class like this:
/// <summary>
/// A Class to wrap a Foo value.
/// </summary>
public class FooWrapper: IDisposable
{
    /// <summary>
    /// The wrapped Foo value
    /// </summary>
    public bool Foo { get; }

    /// <summary>
    /// Initializes a new instance of the <see cref="FooWrapper"/> class.
    /// </summary>
    public FooWrapper()
    {
    }

    /// <summary>
    /// Initializes a new instance of the <see cref="FooWrapper"/> class,
    /// with the given value for foo.
    /// </summary>
    public FooWrapper(bool foo)
    {
        Foo = foo;
    }

    /// <summary>
    /// Releases unmanaged and - optionally - managed resources.
    /// </summary>
    /// <param name="disposing">
    ///     <c>true</c> to release both managed and unmanaged resources;
    ///     <c>false</c> to release only unmanaged resources.
    /// </param>
    protected virtual void Dispose(bool disposing)
    {
    }

    /// <summary>
    /// Performs application-defined tasks associated with freeing,
    /// releasing, or resetting unmanaged resources.
    /// </summary>
    public void Dispose()
    {
        Dispose(true);
        GC.SuppressFinalize(this);
    }
}
What's wrong with this class? The signal-to-noise ratio is atrocious, and I consider this downright harmful to understanding what the class does, and of course the comments get outdated even quicker the more there are. Let's break it down into the useful and useless:
FooWrapper: A Class to wrap a Foo value.
Potentially useful. This tells me what the class is meant for, but sane naming of the class already does that. It could be more useful to explain why Foo needs to be wrapped and when I should use this instead of just passing around the Foo value directly, and when to subclass it.
Foo: The wrapped Foo value
Useless. I know it's a wrapped Foo value because it's a property named Foo in a class named FooWrapper. What could make this useful is by explaining what this Foo value represents, and what I would use it for.
FooWrapper: Initializes a new instance of the <see cref="FooWrapper"/> class.
Useless. I know that it initializes a new instance of the FooWrapper class, because it's a constructor of the FooWrapper class. That's what constructors do, they initialize new instances of the class they are part of. There is no other information conveyed here - no information about potential side-effects, about valid input arguments, about potential Exceptions, nothing.
The overload that tells me that the bool foo argument will initialize Foo to the given foo is also useless, because - well, duh, what else is it's going to do?
Dispose: Releases resources
Useless. IDisposable is a fundamental language feature, so both the reason for this method and the Dispose pattern are well known. What isn't known is if there's anything noteworthy - does it dispose any values that were passed into the constructor? (Important e.g., when passing Streams around - whose job is it to close/dispose the stream in the end?). Are there negative side effects if NOT disposing in time?
Useful comments
Now, this class is arguably a very simplistic example. But that makes it also a very good example, because many applications and libraries contain tons of these simple classes. And many times, it feels that they are commented like this out of Malicious Compliance in order to shut the compiler warnings up or fulfill some "All Code must be documented" rule.
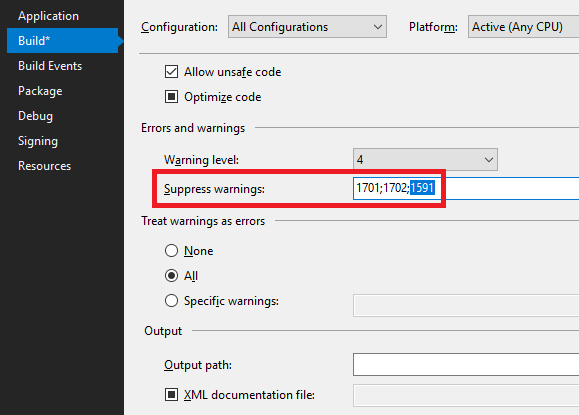
The real solution is to suppress the 1591 warning and only add comments to code that do something non-obvious or critical to pay attention to. In the case of the above example class, the best I can come up with is below.
/// <summary>
/// This class wraps a Foo value, captured
/// from when the operation was started.
///
/// Operations that need to capture additional values
/// should derive from this to add their own additional
/// values.
/// </summary>
public class FooWrapper : IDisposable
{
    /// <summary>
    /// The Foo that was wrapped at the beginning of the operation.
    /// Changes to the Foo value in the holder class do not change this value.
    /// </summary>
    public bool Foo { get; }

    public FooWrapper()
    {

    }

    public FooWrapper(bool foo)
    {
        Foo = foo;
    }

    /// <summary>
    /// This class implements IDisposable to allow
    /// derived classes to capture values that need to be
    /// disposed when the operation is finished.
    /// </summary>
    protected virtual void Dispose(bool disposing)
    {
    }

    public void Dispose()
    {
        Dispose(true);
        GC.SuppressFinalize(this);
    }
}
Now, the comments convey useful information: We learn the intent of the class - that's something not obvious from the code. Though arguably, this class should now be called InitialOperationState or something like that. It also explains why/when to create subclasses for it. The comment on the property now explains something about the purpose, rather than just reiterating the code in prose. And finally, the Dispose(bool) method explains why it's there. The constructors and Dispose() methods do not need any comments - they don't do anything worth commenting.
And because I suppressed 1591, the compiler is happy as well.
The .NET Framework has had support for LDAP through the System.DirectoryServices Namespaces since forever. This has been a P/Invoke into wldap32.dll, which limited the ability for developers to troubleshoot issues and wasn't platform-independent. With the advent of .NET Core and the desire to run applications on Linux or macOS, the lack of LDAP Support has been an issue.
In the JAVA World, it's normal to have fully managed libraries in lieu of platform-limited wrappers, and LDAP is no Exception. These days, the Apache Directory LDAP API™ looks like the go-to, but way back in the day, Novell also had an LDAP Client. This was eventually donated to the OpenLDAP project and lives in the JLDAP tree, although development has long since stopped. Back in the day, Novell used to own Mono, and during that time they made a C# conversion of their LDAP Client. The code was clearly ran through an automated JAVA-to-C# converter, but it offered a fully managed way to access LDAP.
Over the past couple of weeks, I've made some contributions as well, mainly to add support for SASL Authentication, which is available since Version 3.0.0-beta4. At this time, only the CRAM-MD5, DIGEST-MD5 and PLAIN mechanisms are available, but this offers the foundation to connect to a wider range of directories in case Simple LDAP Bind isn't an option.
An example of how to connect using DIGEST-MD5 an LDAP Directory (in this case, Active Directory):
var ADHost = "mydc.example.com";
var saslRequest = new SaslDigestMd5Request("Username", "Password", "Domain", ADHost);

using (var conn = new LdapConnection())
{
    try
    {
        conn.Connect(ADHost, 389);
        conn.StartTls();
        conn.Bind(saslRequest);
        Console.WriteLine($"[{conn.AuthenticationMethod}] {conn.AuthenticationDn}");
    }
    finally
    {
        if (conn.Tls)
        {
            conn.StopTls();
        }
    }

}
Now, whether this is preferable over simple bind is up for discussion - the fact that DIGEST-MD5 requires the domain controller to store the password with reversible encryption is certainly a potential issue. But on the other hand, if you cannot guarantee the security of the transport, DIGEST-MD5 at least means your password will never have to be sent over the wire.
Ultimately, support for the SASL EXTERNAL mechanism with Client Certificates and support for Kerberos will offer modern security/authentication mechanisms. But the bottom line is that there is now a 100% managed LDAP Client for .net that's in active development. One that is supposed to support any LDAP Server instead of focusing mainly on Active Directory, but one that will offer first class Active Directory support as well. For Stack Overflow Enterprise, we made first class LDAP Authentication support a big goal for the future. We want to support as many real-world environments as possible, and we want everything to work on .NET Core as well. There's still plenty of work to do, but I'm happy that this project exists.
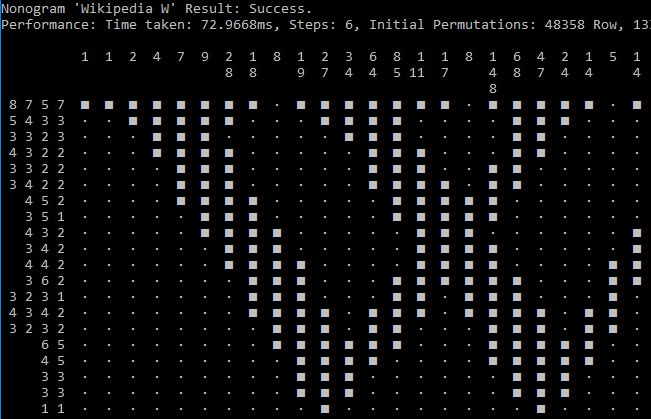
Nonograms - also known as Griddlers, Picture Crosswords, or Picross - are pretty cool puzzles, kind of like a more visual Crossword puzzle or Sudoku. Of all the games on my New 2DS XL, Mario's Picross and the Picross e series are near the top of my Activity Log (beaten only by Smash Bros).
I got curious about algorithmic solutions to those Nonograms, which seems deceptively easy, but is actually NP-complete. When trying to solve a Nonogram, often I can to only fill in one or a few cells of a group, which then leads to another cell that can be filled in (or X-ed out), and step by step, cell by cell, I solve the Nonogram. Now, that assumes that the Nonogram is properly designed - if that's the case, then there is always at least one cell that either must definitely be filled or definitely be empty.
All of Jupiter's games are well designed - even the most tricky ones (with a bunch of 1's and 2's and no big numbers) always follow the mantra of There's always at least one cell that has a definitive solution. There are a lot of other games on the market (Steam returns about 15 games when searching for Picross or Nonogram), and some are not well designed and actually require guessing.
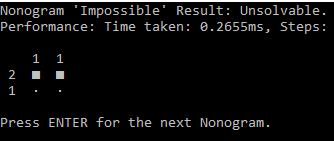
I ended up (after a bunch of googling approaches and other existing solvers) with a solution that's mostly brute force - generate all possibilities for a row and column, then eliminate those that can't be correct, rinse and repeat until there's only 1 possibility left for each row and column, or until we determined that the Nonogram is actually unsolvable. There are some shortcuts that we can take, e.g, when a row/column is empty, completely filled, or completely filled with gaps in-between them.
If it consumes electricity, chances are good that I worked with it or at least know about it. SysAdmin during the 90's, Blogger and professional Programmer since the mid-2000's. Professional C# (ASP.net MVC/Web API) and JavaScript (Browser and node.js) developer. In the past I also worked with Basic, Delphi. Java, and PHP. Did some Ruby and Go code as a hobby. 6502 Assembly is art.
License
Unless explicitly stated otherwise, any code posted on the blog is licensed under The MIT License.


