I've been saying for a while that the Mid 2010 Mac Pro was the best computer I've ever owned. The internal layout was just so great, swapping out hard drives or RAM was easy, no cables in the way, airflow well thought out, just awesome.
Unfortunately, being a Mac limits upgrades. While there are ways to upgrade the CPU, upgrading the video card requires some firmware flashing and trial and error. I had some luck buying a card to drive my 4K Monitor off MacVidCards, but the pricing for anything decent just didn't work for me.
After 5 years, it was time to relegate my Mac Pro to be dedicated to Logic Pro X and Final Cut Pro X and go back to building a PC. I still had some leftover parts from my previous PC and ended up with this parts list for a bit less than $1000:
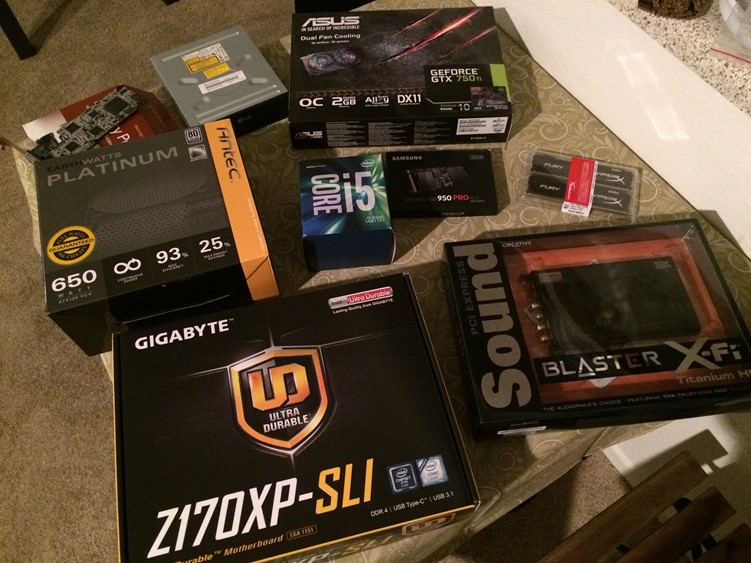
The pieces
(Disclaimer: Intel, nVidia and Gigabyte have been sponsors of my employer and are advertising with a game made by said employer. My choice these components was independent of that and mostly driven by price, availability and benchmarks from sites like Tom's Hardware or Anandtech or whatever Google came up with.)
For the case, I had to concede that PC cases just can't compete with the Mac Pro. The Corsair case looks nice from the front, has no obnoxious window in the side, is mostly toolless and has enough space. Check the YouTube review linked above. I went with a 650W power supply which is more than plenty to support the 65W CPU, 60W Graphics Card and all the other stuff. 80Plus Platinum for just under $100 is neat. It's not modular, but modular PSUs usually result in me losing the extra cables anyway.
On the CPU side, Intel is a no-brainer these days for games. Skylake Core-CPUs just came out, are priced really well and are fast as heck. Since I don't care about overclocking, the i5-6500 won out over the 6600 or 6600K simply because it's a lot cheaper.
Going with that is a Z170 chipset board. The Z170XP-SLI isn't very expensive, has USB 3.1 Type-C port, supports DDR4 and has a M.2 SSD slot – more on that later.
I have a collection of RAM sticks at home, mainly because whenever I upgrade RAM, the old doesn't fit in any machine. This machine comes with yet another type of RAM, DDR4. How much you need is always up for discussion, I wouldn't go below 8 GB these days, and I didn't see a reason to get more than 16 GB. YMMV, but RAM is cheap enough to err on the side of more. Make sure to get a pair – the CPU uses dual channel memory controllers, which means that you should use two or four modules and if you use two, make sure to populate the two slots of the same color. I got DDR4-2133 memory which is technically the slowest, but the only speed the board supports without overclocking. A lot of marketing talks about support for faster DDR4 speeds, but in parentheses you usually see (O.C.). I'm not interested in overclocking, so I went with the speed that's supported.
The OS drive is pure luxury overkill. Getting an SSD is a must these days, and normally I'd have gone with a Samsung 850 Pro – StorageReview can tell you why. This is still a S-ATA based SSD though. S-ATA was aimed at mechanical hard drives and is limited to 6 Gigabit/s. A 256 GB drive runs at about $130. On the other hand, the 950 Pro uses the M.2 slot and supports NVM Express (NVMe). It's shaped like a stick of gum and sits directly on the motherboard – that's why I went with this board. It's ridiculously fast (2.5 GB/s compared to 550 MB/s on the 850 Pro), although IOPS are roughly the same. I'd not consider anything but Samsung these days as they make all components – flash chips, controller, finished product – and aren't priced much differently than the competition.
The graphics card is the one component where I had to compromise. My number one choice would've been a Geforce GTX-970. However, these cards (and other 2nd generation Maxwell cards) suffer from coil whine, which is a high pitched noise when playing games. I didn't want to take the risk, so I went with a first generation Maxwell-based GTX 750 Ti which are cheaper and will work well as a stopgap until coil whine is solved.
Whether or not you need a sound card is debatable these days. I had the X-Fi Titanium HD and love the cinch outputs to go to my amplifier.
I love my K70 keyboard because of the media keys (complete with a volume wheel) and because mechanical keyboards are just a must-have.
NVM Express and Windows
The thing with brand new hardware standards is that older operating systems don't support it well. In my case, I was faced with the preference to run Windows 7 and the necessity to support a NVMe-based boot drive. There is a hotfix to add NVMe support to Windows 7, and Intel has a set of instructions. But at the end of the day, it was time to go to a newer version of Windows.
Windows 10 supports a NVMe boot drive natively, so no issues there.
November 14th, 2015 in
Uncategorized
I have a 4K Monitor connected to my Mac Pro. However, since 4K on 28" is a bit too small for my taste, I prefer to make use of OS X's scaling options and run a 2560x1440 resolution.
As OS X is vector based internally, it is capable of pretending to run in that resolution but still output a native 4K image to my monitor - in other words, the output should be razor sharp and crisp.
However, when I looked at the options (System Preferences > Displays > Scaled), I noticed that all the non-native options were marked as (low resolution) and when selected, text looked blurry.
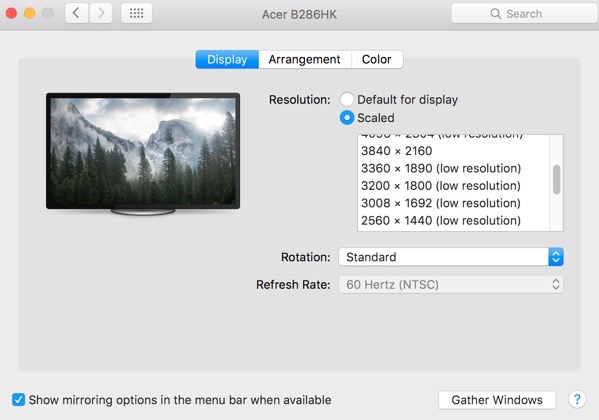
The trick is to hold down Option (Or "Alt" on non-Mac keyboards) and click scaled - this will unlock additional resolutions, including a 2560x1440 without the (low resolution) suffix that looks as it should be - crisp.
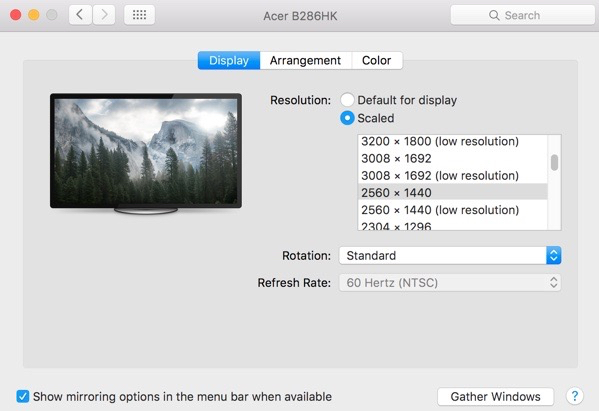
I don't know why these don't show up by default - I have a third-party graphics card (Geforce GT 640 from MacVidCards instead of the original, non-4K supporting Radeon 5770) and a third party monitor (Acer B286HK).
October 17th, 2015 in
Apple,
Hardware | tags:
mac os x
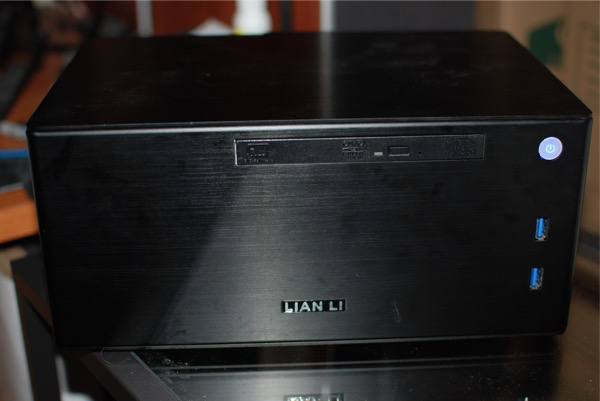
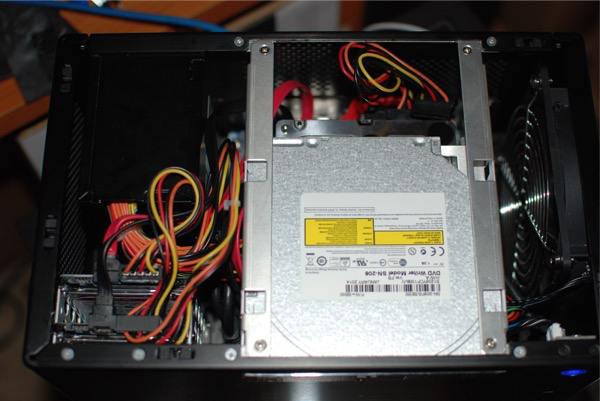
Over a recent long weekend, I've decided to build a small NAS for home use, mainly to have some of my data backed up and to have an archive of old stuff I don't need all the time. Both of my Laptops have 256 GB SSDs, and while that's usually enough, it's good to have some extra headroom sitting around.
The idea was to:
- Have a place to backup my stuff
- Have a machine that can do BitTorrent downloads on its own
- Have a machine that allows my to access big files from multiple other PCs
- Have a machine that works as a local git server
The Hardware
I bought the motherboard and case a few years ago for something else, so I think better options are available now.
The desired setup:
- Use the 128 GB SSD as the boot drive - because it's mSATA it fits directly on the motherboard, and doesn't take up space for mounting drives
- Use the two 2.5" 1 TB drives as a RAID 1 - that way, I'm protected against hard drive failure. Do note that RAID 1 is more an availability than a safety thing because viruses or accidential deletion of files isn't something a RAID can help with
- Use the one 3.5" 3 TB drive as a big store for non-critical stuff, like backups of my Steam games or temporary BitTorrent files
The case doesn't have much space for drives, even though the motherboard has plenty of S-ATA ports.
For the operating system, I went with OpenBSD 5.7 x64. I prefer OpenBSDs very minimalistic approach of offering a tiny base system, and then allowing me to add exactly the pieces of software that I need. I'm not going to give a full rundown of how OpenBSD works, because if you're really interested you should definitely read Absolute OpenBSD.
Basic System Setup
Do setup a user during setup - in my case, I called him User.
My 128 GB SSD is partitioned as follows:
#                size           offset  fstype [fsize bsize  cpg]
  a:             2.0G               64  4.2BSD   2048 16384    1 # /
  b:             8.2G          4209024    swap                   # none
  c:           119.2G                0  unused
  d:             4.0G         21398592  4.2BSD   2048 16384    1 # /tmp
  e:            15.0G         29800544  4.2BSD   2048 16384    1 # /var
  f:             8.0G         61255840  4.2BSD   2048 16384    1 # /usr
  g:             2.0G         78027680  4.2BSD   2048 16384    1 # /usr/X11R6
  h:            15.0G         82220640  4.2BSD   2048 16384    1 # /usr/local
  i:             3.0G        113675936  4.2BSD   2048 16384    1 # /usr/src
  j:             3.0G        119957344  4.2BSD   2048 16384    1 # /usr/obj
  k:            59.0G        126238752  4.2BSD   2048 16384    1 # /home
The best setup varies on preference of course, in my case I stuck mostly to the OpenBSD defaults and only gave /usr/src and /usr/obj some extra space.
After the system boots up for the first time, add powerdown=YES to /etc/rc.shutdown. This turns off the machine when shutdown -h now is called. Do note that halt doesn't seem to respect that, and needs to be invoked with halt -p. To my delight, pushing the power button on the case turns off the machine properly - hooray for working ACPI support!
The first thing before installing any software should be to follow -stable, recompiling the kernel, userland, and xenocara.
# cd /usr
# export CVSROOT=anoncvs@anoncvs.usa.openbsd.org:/cvs
# cvs -d$CVSROOT checkout -rOPENBSD_5_7 -P src ports xenocara

# cd /usr/src/sys/arch/amd64/conf
# config GENERIC.MP
# cd ../compile/GENERIC.MP
# make clean && make
# make install
# reboot

# rm -rf /usr/obj/*
# cd /usr/src
# make obj
# cd /usr/src/etc && env DESTDIR=/ make distrib-dirs
# cd /usr/src
# make build
# cd /usr/xenocara
# rm -rf /usr/xobj/*
# make bootstrap
# make obj
# make build
# reboot
This takes a long time, over an hour on this machine. After that, it's time to do package setup
Add FETCH_PACKAGES=yes to /etc/mk.conf, and export PKG_PATH=ftp://ftp5.usa.openbsd.org/pub/OpenBSD/5.7/packages/amd64/to begin installing packages.
The OpenBSD packages and ports system is a bit interesting, because it seems that packages are built only once when a new OpenBSD version is released, and then never updated. You have to manually compile newer versions of software. That's not that big of a deal, because with FETCH_PACKAGES enabled, the system will fetch packages if they are still the correct version and only build ports where needed.
Setting up a data drives, incl. RAID 1
I decided that my data drives should live under /var/netshared, so I created this and two subdirectories - data and glacier. I will set permissions later.
I have 2x 1 TB hard drives, from which I want to build a RAID 1. First, setup disklabels for both drives (disklabel -E sd0, then sd1), making sure that the partition type is RAID instead of the default 4.2BSD.
OpenBSD area: 0-1953525168; size: 931.5G; free: 0.0G
#                size           offset  fstype [fsize bsize  cpg]
  a:           931.5G                0    RAID
  c:           931.5G                0  unused
Then, run bioctl -c 1 -l sd0a,sd1a softraid0 to create the RAID. The -c 1 flag sets the RAID level (RAID 1 = mirroring), and -l (lowercase L) is a list of partitions that form the raid. The softraid0 at the end is an internal identifier - it must start with softraid. bioctl will then create a new device that will appear like a hard drive and can be used as such.
The actual device will be something like /dev/sd4. You need to run disklabel on the new device to create a partition, this time of the usual 4.2BSD type. In order to add it to /etc/fstab, you need to get the duid, which you can get by running disklabel sd4:
# /dev/rsd4c:
type: SCSI
disk: SCSI disk
label: SR RAID 1
duid: cc029b4fe2ac54dd
(I do note that using duids in fstab is optional, but I highly recommend it as it makes you independent of device name changes as long as the actual drive is the same)
Remember to run newfs /dev/sd4a to create a file system. OpenBSD will pick FFS for drives smaller than 1 TB, and FFS2 for drives bigger than 1 TB. Check man newfs for options.
Here's how my fstab looks:
e8bd5e30aba4f036.b none swap sw
e8bd5e30aba4f036.a / ffs rw 1 1
e8bd5e30aba4f036.k /home ffs rw,nodev,nosuid 1 2
e8bd5e30aba4f036.d /tmp ffs rw,nodev,nosuid 1 2
e8bd5e30aba4f036.f /usr ffs rw,nodev 1 2
e8bd5e30aba4f036.g /usr/X11R6 ffs rw,nodev 1 2
e8bd5e30aba4f036.h /usr/local ffs rw,nodev 1 2
e8bd5e30aba4f036.j /usr/obj ffs rw,nodev,nosuid 1 2
e8bd5e30aba4f036.i /usr/src ffs rw,nodev,nosuid 1 2
e8bd5e30aba4f036.e /var ffs rw,nodev,nosuid 1 2
cc029b4fe2ac54dd.a /var/netshared/data ffs rw,nodev,nosuid,noexec,noatime 1 2
f4540651dabd448d.a /var/netshared/glacier ffs rw,nodev,nosuid,noexec,noatime 1 2
Notice the nosuid,noexec,noatime,nodev flags on the two data drives. This is just some precaution against malicious files, and noatime is just to reduce disk wear by a tiny fraction. Check the manpage of mount for more information.
Setting up a user
During OpenBSD Setup, a user should've been setup. If you decided not to, use useradd to create one now.
Create a group for access to the shared directories: groupadd netshared
Add the user to that group: user mod -G netshared User
Change owner and permissions:
chown -R User:netshared /var/netshared/*
chmod -R 0770 /var/netshared/*
Note that the execution-bit is required to traverse directories, so chmod 0660 wouldn't work as a permission mask. Since the file system is mounted noexec, it doesn't matter anyways.
Installing Samba
Start by installing the samba port:
# cd /usr/ports/net/samba
# make install
Then, configure samba (thanks Pierre-Philipp Braun for the tip with sed):
cd /etc/samba/
mv smb.conf smb.conf.dist
sed '/^#/d; /^;/d; /^$/d;' smb.conf.dist > smb.conf
vi smb.conf
Here's my smb.conf:
[global]
   workgroup = WORKGROUP
   server string = Samba Server
   security = user
   load printers = no
   log file = /var/log/samba/smbd.%m
   max log size = 50
   dns proxy = no
   printing = BSD
   unix extensions = no
   allow insecure wide links = no
[data]
   path = /var/netshared/data
   valid users = User
   writable = yes
   printable = no
[glacier]
   path = /var/netshared/glacier
   valid users = User
   writable = yes
   printable = no
If you want to give access to groups instead of individual users, prefix with an @-sign: valid users = @netshared
The manpage - man smb.conf - is very extensive. If you want to finetune permissions, take the time to browse through it.
To start samba on system startup, add this to /etc/rc.conf.local:
pkg_scripts="samba"
samba_flags=""
This should be it - start samba through /etc/rc.d/samba start and try accessing your new file shares!
Using the server as a git server
This isn't really a NAS-specific, but git specific. If you want to install git on the server, cd /usr/ports/devel/git and make install.
Create or clone a bare repository on the NAS:
cd /var/netshared/data
mkdir myrepo.git
cd myrepo.git
git init --bare
Or clone an existing repository as a bare clone:
cd /var/netshared/data
git clone --bare https://github.com/mstum/faml.git
Then, on your machines, clone from that repository:
git clone \\nas\data\faml.git
This will automatically set up an origin remote on your local clone, so any changes you make on your laptop can be pushed to the server through git push.
Setting up a BitTorrent client
Install the port of transmission:
cd /usr/ports/net/transmission
make install
This will automatically create a _transmission user - add it to the netshared group:
user mod -G netshared _transmission
Create folders for BitTorrent:
mkdir /var/netshared/glacier/BitTorrent
mkdir /var/netshared/glacier/BitTorrent/incomplete
mkdir /var/netshared/glacier/BitTorrent/complete
mkdir /var/netshared/glacier/BitTorrent/watch
chown -R User:netshared /var/netshared/glacier/BitTorrent
Edit the /var/transmission/.config/transmission-daemon/settings.json file (if it doesn't exist, run /etc/rc.d/transmission-daemon start and then stop it - changes to the file will be lost if you edit it while the daemon is running)
Important settings/changes:
"download-dir": "/var/netshared/glacier/BitTorrent/complete",
"incomplete-dir": "/var/netshared/glacier/BitTorrent/incomplete",
"incomplete-dir-enabled": true,
"rpc-whitelist": "127.0.0.1,192.168.1.*",
"rpc-whitelist-enabled": true,
"watch-dir": "/var/netshared/glacier/BitTorrent/watch",
"watch-dir-enabled": true
These settings make it so that any .torrent you drop into the watch directory immediately gets added and started. Downloads go into the incomplete directory while they are downloading, and are then moved to the complete directory afterwards.
rpc-whitelist is a comma-separated list of IPs that can remotely control transmission, so this should be limited to your local network. You can access the web UI on http://nas:9091/transmission/web which is pretty neat.
To auto-start transmission, edit your /etc/rc.conf.local and add transmission_daemon to the pkg_scripts. I recommend starting it before samba, so that samba gets shutdown before transmission. (OpenBSD stops services in the reverse order of startup).
Keeping up to date
Keeping OpenBSD up to date is described in the following -stable link above. Basically, CVS update all of src, ports, xenocara if needed, then recompile and reboot.
To check if your ports are up to date, you can run /usr/ports/infrastructure/bin/out-of-date, then cd into any ports and run make update.
Note that if you've installed a package, it's safe to update it through make update in the ports directory - packages are really just precompiled ports, no "magic".
Closing Remarks
This was really just a howto of how setup my NAS currently, aimed at people that already know OpenBSD. If you're curious about a *NIX server and don't mind spending some time to learn the system. I'm highly pleased with OpenBSD. The system is minimalist - there are not many moving parts by default - and really invites to understand stuff properly.
If you have a more sophisticated NAS setup, you may want to look at FreeNAS as well. Do note that the 8 GB minimum RAM requirement is not a joke - FreeNAS will install and seemingly run on 4 or even 2 GB, but random data loss is almost guaranteed to occur.
I had a strange issue with VLC on OS X: Whenever I tried to play anything, it would hang and needed to be force quit.
The culprit was that by default, it tries to remote control iTunes, basically stopping iTunes playback when VLC wants to play. However, my iTunes was unresponsive (currently moving my Library folder) and thus any attempt of VLC to communicate with iTunes would just lead to a hang.
The solution is to start VLC, go to Preferences and disable controlling of external players.

August 27th, 2015 in
Entertainment | tags:
mac os x
This morning, I forgot to put on my Apple Watch. It's the second day in a row that this happens. And I realized that it's fine, I'm not missing out on anything. If I forget my phone, I'll go back and get it, but for my watch it's just not worth it.
When I bought it, I knew it was an experiment. I got the sport model, which is still $349, but I figured that I would get at least that much entertainment out of it. I had lost my FitBit a few weeks ago when the armband broke and figured that the watch would also serve as a replacement for that.
While it does track heart rate and steps, I found that for myself these values were rather meaningless. Steps are already counted by my iPhone, and heart rate isn't that useful for my training regimen (I'm doing weight training, since running doesn't help with muscle building and getting a good body). That's not the fault of the watch of course, it's a change in my habits, where Weight, Body Fat% and how much I can lift are the metrics I'm interested in, metrics which the watch can't track by itself.
Apart from that, the Watch has been useful mostly to glance at incoming messages and serve as a calendar reminder, but actually interacting with them is still better done on the phone. Matt Gemmell wrote a good piece about how it helps him avoiding distractions, but it didn't have the same effect for me.
I don't regret buying the Watch, but if someone would offer me close to what I paid for it, I'd part with it immediately. I guess that smartwatches just lack a must-have feature to be really attractive, and with reports saying that sales dropped by 90% I don't seem to be the only one that thinks something is missing.
Whatever it is that is missing, I'm pretty sure that I'll go back to my previous wristwatch. That one also doesn't need to be put on a charger every night.
July 8th, 2015 in
Apple,
Technology
I have an app.config with some custom sectionGroups:
<configSections>
	<sectionGroup name="MyApp">
		<section name="foo" type="System.Configuration.NameValueSectionHandler, System, Version=4.0.0.0, Culture=neutral, PublicKeyToken=b77a5c561934e089" />
	</sectionGroup>
</configSections>
<myApp>
	<foo>
		<add key="MySetting" value="14"></add>
	</foo>
</myApp>
I wanted to externalize that:
<MyApp configSource="myapp.config">
This yields an error:
System.Configuration.ConfigurationErrorsException: The attribute 'configSource' cannot be specified because its name starts with the reserved prefix 'config' or 'lock'.
Long story short: configSource only works on <section> elements, not on <sectionGroup>.
June 26th, 2015 in
Development | tags:
net
Everyone expects self-driving cars to be the next world-changing revolution, and it is easy to see why. Image recognition has made insane improvements in the last decade - Facebook's face detection is sometimes uncanny in its ability to differentiate people from objects. Google Maps routing features have improved leaps and bounds since the first release, and with cellphone connectivity becoming more and more ubiquous, it's feasible to monitor traffic in real time.
We have electric cars that aren't complete crap anymore. Hybrids like the Prius have been pretty normal for years now, and both BMWs i3 and eventually Tesla's Model 3 are fully electric cars set to break the price barrier, making them more than a gimmick for the hipster crowd.
These cars don't have to be electric, but it will be an important factor in the actual revolution. I grew up in Europe, lived in Paris, France for a few years. I've seen what public transportation can do - buses, trains, subways - to reduce the need for a car. In the US, public transportation is mostly shit, except in some cities (never been to New York, but Los Angeles has somewhat functional public transport).
Self-driving cars will be the public transportation revolution that America needed, the biggest push since building the train system in the 1800s. Right now, car ownership is the norm for people in America. A lot of families own a car per adult family member. The belief is that those families will buy self-driving cars in the same manner, essentially keeping the car market as-is and just remove the need to personally drive.
I think that people aren't going to buy as many cars in the long run. Self-driving cars are essentially like trains, except that their "tracks" are ubiquous. Companies like Uber (or maybe Lyft or maybe some new company that hasn't been founded yet) will go after Amtrack and similar companies with the same force as they are going after the taxi business.
Why own your own car if you can just call one? Right now, even the cheap Uber option costs enough money to not be a serious primary means of transportation for most people. But imagine if Uber no longer has to pay the driver of the car. At that point, they basically pay for repairs, fuel, and insurance, plus their profit margin. Instead of being a company that subcontracts thousands of drivers, they would be a company that buys tens of thousands of self-driving cars.
This is where the fact that they are electric cars is important - apart from having charging stations all over the place, we should look at upgrading busy streets to help charging the cars. Solar Roadways is an early attempt at converting streets into huge solar panels, and if someone comes up with a way to charge a car from the street (metal contact plates in the tires?), the range of electric cars could increase a lot. And since it's solar power, there is potential to really bring the prices down after the initial investment.
Of course, there is a lot of Utopia in this - Electric Self-Driving Cars, charged in part with free, unlimited energy through Solar Roadways, available for hire at a price that makes car ownership a status symbol instead of a neccessity.
Undoubtly, lobbying will be severe, from car makers in Detroit to unions of drivers that are facing unemployment, People will claim that owning a car is owning the freedom to go wherever, whenever, and that a gas guzzling V8 truck is patriotic.
But in the end, I see the end of car ownership for millions of people. The "freedom" argument won't hold much once you can call a car to be with you in five minutes, at any time of the night. Self-Driving Cars don't need to sleep, they don't fear driving into shady areas and they won't complain if you need a fifty mile ride at 3 a.m. Especially not if it will be significantly cheaper than owning one. We might even seen more carpooling since an intelligent routing system can just pick up a bunch of people on the way.
This will happen in my lifetime.
A lot of us know that feeling: We work hard, we make a salary that should be plenty, but somehow the balance on our savings never get really high. Or you're interested in buying a home and need to save up at least 3.5% for an FHA loan, plus the money you need to move and install a secret door.
I've never done any budgeting, and the amount of financial planning I did was mostly "Make sure the checking account has always enough balance for the next rent, and that the credit card never exceeds what I can pay back at the end of the month". After all, finance is booooooring. For me, there was an extra difficulty as I'm an immigrant to the USA and just didn't know much about money in this country. The 2008 crash didn't help spark my interest either (my #1 priority: Make sure the money is FDIC insured).
Boy, if I could go back to when I first arrived here and I could only tell my past self one thing, then it's to be a bit more financially honest and save money. Oh, and pick up a copy of Get a Financial Life, it's an awesome, not dry overview of the stuff that matters. And for god's sake, don't wait four years to setup a 401(k).
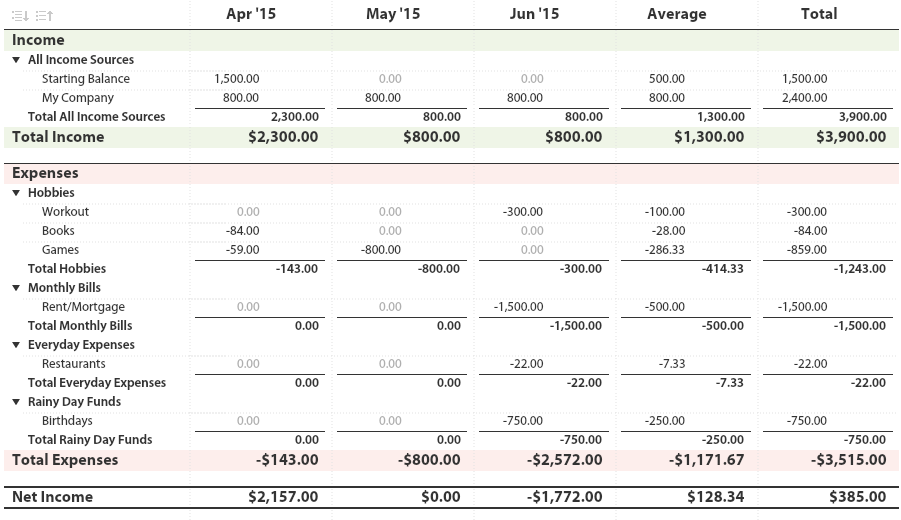
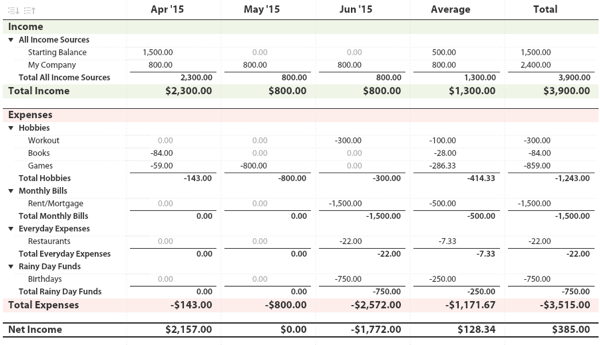
For the past few months, I've been using You Need A Budget (YNAB) to get an overview about where my money goes. They have a Four-Rule-Methodology, which is useful if you need to control your spending and want to make a household budget, but I've been using it as a reporting tool to get a feel for it. The general idea is that you add your accounts (Checkings, Savings, Credit Cards, Loans, ...) and assign each transaction a category of your choice.

This takes a few hours when you're just starting out - most banks and credit cards should offer a Quicken (.qfx) or CSV Export, which you can mass-import into YNAB. You'll be creating and tweaking categories (e.g., I have categories based on different hobbies) and assign all your transactions to it. I recommend starting small, with just the info from last month and then adding more and more to it if you want. The more data you have, the better reporting is, but the longer it takes to setup.
Once your transactions are in and categorized, you can report on it. This is where we're getting serious because now you're really seeing how much all these little $4.99 purchases add up to.
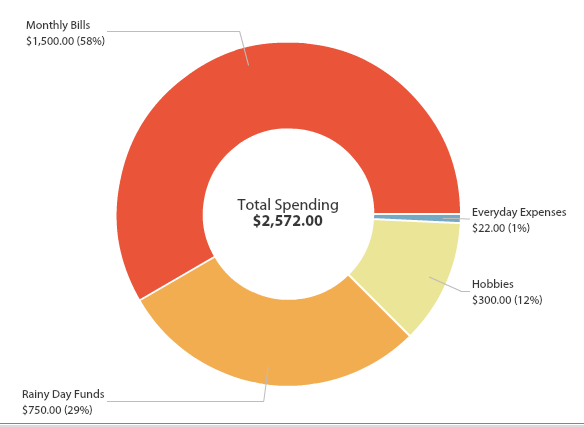
Clicking on a category allows you to dig in or see which transactions are part of this.
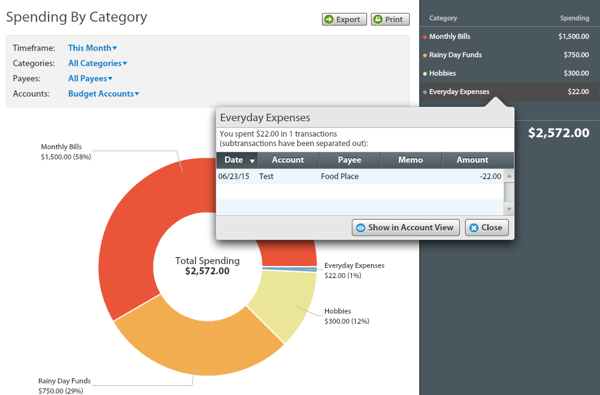
This is pretty eye-opening, but if you need some more motivation there is a handy Income v. Expense report. If you manage to have an entire year of transactions, this report can be pretty disturbing - it's an honest, no-BS assessment of your financial discipline.
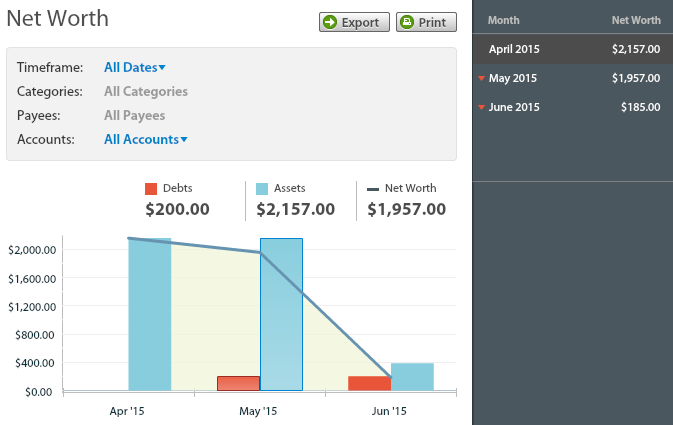
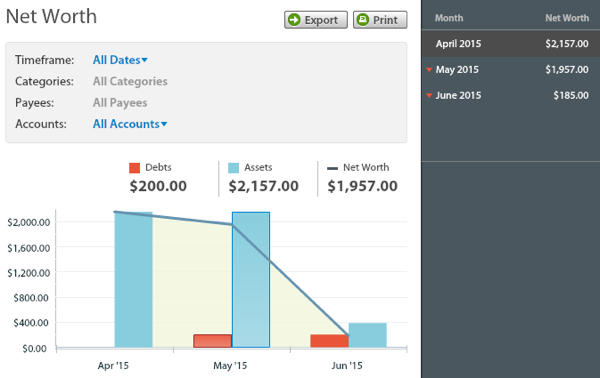
YNAB also supports Debt-Accounts, like Credit Cards or Loans, and a Net Worth graph.
I'm not going much into the Budgeting features of YNAB - it's arguably the feature it advertises the most, but it's also the thing that takes effort. If you don't have anything right now, then just going in and using it for reporting will be a huge eye-opener already.
When it comes to money, it is important to be honest to yourself - it's okay to spend thousands of dollars on your hobby, as long as you know that's where the money goes and don't end up at the end of the year looking at a zero-sum game and an emergency fund that is still empty.
June 24th, 2015 in
Applications | tags:
money
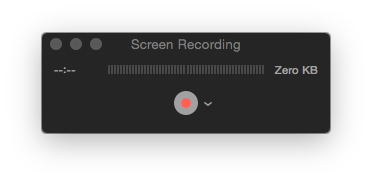
One of the unknown features of newer versions of QuickTime (at least on OS X) is the ability to record videos (Arguably, QuickTime Player is misleading as a name), either from a connected camera or from the screen. Click File > New Screen Recording to bring up the recorder. If you want, select "Show Mouse Clicks in Recording".
After you're done recording, you can do some trimming right in QuickTime as well - Edit > Trim.
Now you have a QuickTime file - great, but the point is to create an animated GIF from it. For that, we'll use two free tools: ffmpeg and gifsicle. Since we're on OS X, homebrew will do the heavy lifting for us.
brew install ffmpeg
brew install gifsicle
With both installed, we can now convert the video:
ffmpeg -i MyRecording.mov -r 10 -f gif - | gifsicle --optimize=3 --delay=3 > MyRecording.gif
Since I want to do this often, I've added a shell command to my .zshrc:
function movtogif {  if [[ $# = 0 ]]
  then
    echo "USAGE: movtogif filename.mov"
  else
    ffmpeg -i bash -r 10 -f gif - | gifsicle --optimize=3 --delay=3 > bash:r.gif
  fi
}
For reference, the :r means to take the file path without extension. See the manpages of ffmpeg and gifsicle for more information about the parameters.
Thanks to Alex Dergachev for the original idea.
June 7th, 2015 in
Development | tags:
mac os x
George R.R. Martin went on record saying he still uses Wordstar 4.0 on an old DOS Machine to write his epic 1000 page A Song of Ice and Fire novels. This seems to baffle some people - after all, the only people that don't trust modern technology are people that don't understand it. But often, we overlook that keyboard-driven interfaces are extremely productive once you're over the initial learning curve. I'm still convinced that data entry jobs were at peak productivity when they were terminals talking to mainframes, and that web- or mobile-based software will never, ever reach the productivity levels of those.
Robert J. Sawyer wrote an essay about Wordstar, helpfully subtitled "A Writer's Word Processor". In there he goes into some detail why it is so beloved among it's users:
But touch-typists find that using the WordStar Control-key commands is much more efficient, because they can be typed from the home row without hunting for special keys elsewhere on the keyboard.
To go to the end of the line, you press Control-Q and then D. This seems so much harder and arcane that just pressing the END key on your keyboard, but it can be done without moving your hands - you don't have to take your mind off writing. There is another really important feature that I'll go into details about: blocks.
WordStar, with its long-hand-page metaphor, says, hey, do whatever you want whenever you want to. This is a good spot to mark the beginning of a block? Fine. What would you like to do next? Deal with the block? Continue writing? Use the thesaurus?
After another half hour of writing, I can say, ah hah!, this is where I want to end that block. And two hours later I can say, and this is where that block should go.
Now, Wordstar 4.0 has a bunch of issues these days. One, it's somewhat hard to actually (legally) get it. Then, you need a way to run it on a modern system, e.g., though DOSBox. After you got it running, you know have to figure out how to get your files in and out of your DOSBox. And if you do, you might find that your files show up as gibberish because Wordstar uses 7-Bit encoding for the chars and the 8th (msb) bit as a control char - there are ways around it, but in the end, Wordstar is just too much of a pain these days.
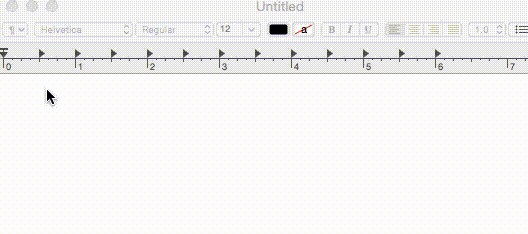
Which leads me to the subject of todays posting: What would a "modern" alternative to Wordstar look like? There are plenty of powerful word processors out there, and there are plenty of distraction-free writers out there. I used iA Writer for most of my writing, especially since it's available on both iOS and Mac OS X. Then again, with my new Macbook I no longer carry my iPad around.
I eventually landed on one of the staples of *NIX systems: joe's own editor, or joe. It's that editor that seems to be mostly forgotten in a world divided between vim and emacs, but I found it to be an awesome writing tool. I use Version 4.0 (UTF-8), installed through homebrew (brew install joe) It's cross platform and also works on Windows.
It has a Wordstar mode, enabled by invoking it as jstar. When you press Control-J, the help opens on top, showing the most important keyboard shortcuts.

Deleting the current line from where the cursor is? Control-Q Y. That's quicker than Shift+END DEL because your hands don't move (even better if you're on a laptop or another keyboard that doesn't have dedicated DEL/END keys).
I've mentioned Blocks above. What's so special about them, isn't it just Cut/Copy/Paste? Yes and no. For one, you don't have to do it all at once. You can mark the beginning of a block (Control-K B), then keep on writing and then mark the end (Control-K K). Go where you want to move it - now or much later, the selection isn't lost if you move around or keep writing - and move it there (Control-K V). Or make a copy (Control-K C) Or delete it (Control-K Y), or undo (Control-U). You can write the block to a separate file (Control-K W), which is great if you want to do some reworking without losing what you had before.
One interesting feature is to filter the block through a Unix Command (Control-K /). If you have a list of words, you can filter it through tr "[:lower:]" "[:upper:]" to make it all-caps for example (the tr manpage shows some more examples). If you know your sed, you can do some real powerful text processing, right in the middle of your file without really having to leave your text editor.
This:

Becomes:

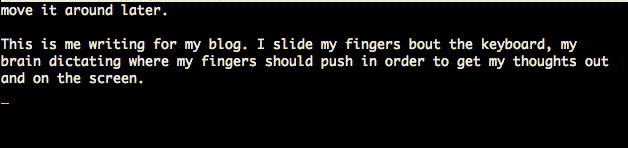
Overall, I think that joe is the editor of my choice for writing prose, because it combines distraction free writing with just enough editing capability to get the job done, all without having to think too much about the editor and moving my hands all over the keyboard to do stuff I have to do a lot. Toggling the help with Control-J allows me to quickly glance at a command while I'm still learning, but because the help isn't modal I'm not losing focus from my text.
June 6th, 2015 in
writing