I was looking for a way to get a list of all user profiles within Sharepoint 2007. The UserProfileManager only has functions to retrieve a single user, but no function that retrieves all users.
The solution is simple, although a bit hard to see: UserProfileManager implements IEnumerable, and it already contains all user profiles!
So you can just do this here:
using Microsoft.Office.Server;
using Microsoft.Office.Server.UserProfiles;

ServerContext ctx = ServerContext.GetContext(SPContext.Current.Site);
UserProfileManager upm = new UserProfileManager(ctx);
foreach (UserProfile u in upm)
{
DoStuffWith(u);
}
to iterate through all profiles.
April 24th, 2008 in
Development,
Sharepoint
Bioware's Mass Effect is possibly one of the best games ever made, at least since the first Knights of the old Republic. Despite some technical problems (slowdown and texture popup), the story with some rather nice twists is just compelling.
There is one optional Mission available on the Xbox Live Marketplace, "Bring down the Sky", for 400 Microsoft Points (or M$, as I call them for short). Now, I got my Xbox set to German, with a UK Version of Mass Effect and a Gamertag that has France as origin country. I was offered both the FR and EN Version, so I picked the EN one. But there is a problem: The Name in the "Downloadable Content" Submenu is blank, the name of the system is blank, and you do not see the "Land" option when you go to the planet on the Galaxy Map.
The solution? Set the Xbox System Language to English, and it works fine. Stupid Bug though, maybe Bioware should do some proper QA on multi-language systems. This is the year 2008 after all, a sloppy quality assurance for the European market with it's different languages is simply unacceptable, especially when you charge an extra fee for the content.
April 16th, 2008 in
Entertainment | tags:
rant
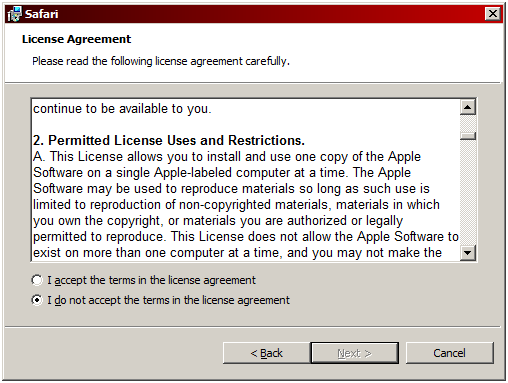
Just a note, if you are interested in installing Apples Safari browser on your Windows PC: As of Safari version 3.1, You are not allowed to. You are only allowed to install Safari on an Apple Computer, which means it's limited to Macs with Bootcamp, unless you decide to violate Apples Terms of Use. Also note that multiple installations are forbidden, as "This License does not allow the Apple Software to exist on more than one computer at a time, and you may not make the Apple Software available over a network where it could be used by multiple computers at the same time."
March 27th, 2008 in
Misc.
This is part 2 in a multi-part series about setting up a build environment under Windows, featuring Subversion. In Part 1, we've set up an Apache Web Server and made it happily live next to an IIS Web Server. In part 2, we will now answer the question "Where's the beef?", or more precisely, we'll set up Subversion.
Part 2: Installing Subversion with Apache integration and user authentication
Ok, Apache is up and running, now let's set up Subversion. Head over to the Subversion Download site, and download Subversion. Important: Make sure to get a Version that is compatible with your Apache version. I assume you use Apache 2.2, and the link in this article leads to a Apache 2.2 compatible Version. At the time of writing, svn-1.4.6-setup.exe was the most recent file to download.
Installation is straight-forward: Download and execute the file and click "Next" until it's finished – no rocket science involved here.
Integrating Subversion with Apache
You might now ask: Why integrate Subversion with Apache? After all, you could just put your repository on a File Share and have your users use file:// URLs to access the repository. Let me quote the Subversion book here:
- Allows Subversion to use any of the numerous authentication systems already integrated with Apache.
- No need to create system accounts on server.
- Full Apache logging.
- Network traffic can be encrypted via SSL.
- HTTP(S) can usually go through corporate firewalls.
- Built-in repository browsing via web browser.
- Repository can be mounted as a network drive for transparent version control.
While there are a few drawbacks (It's a bit slower than file:// or the Subversion-svnserve, and it's a bit more complicated to set up), the main advantages are SSL support, Repository Browsing (while this is rather simple, I found it a very useful feature quite often) and User Authentication that works with any of the eleventy billion ways Apache can do user authentication.
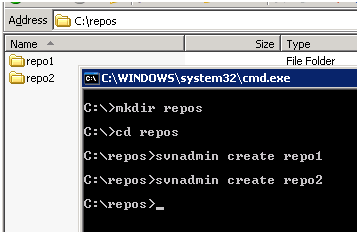
Ok, so let's create a folder for our Subversion repositories. You can setup different authentication for each repository, which is needed when you want to give some people access to only some repositories or when you want people to be able to read but not commit to some repositories while they can commit to others. You can also use different authentication methods, i.e. have the user credentials for some repositories stored in a MySQL database while other repositories use a password file.
To keep the example simple, I use 1 password file that applies to the whole repository tree. I've created a new folder c:\repos and inside that folder, I've created 2 Repositories, repo1 and repo2.
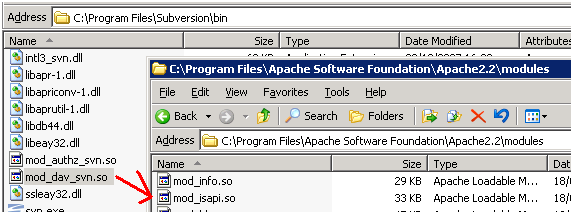
Now, we need to install one module into Apache that comes with Subversion. Open your Subversion\bin folder and copy mod_dav_svn.so to your Apache\modules folder.
Now, open your conf\httpd.conf and look for this line:
#LoadModule dav_module modules/mod_dav.so
Uncomment this line, and add a new line for the Subversion Module:
LoadModule dav_module modules/mod_dav.so
LoadModule dav_svn_module modules/mod_dav_svn.so
That will load the Modules when Apache restarts. But we're not done yet. We now need to tell Apache about our Repository.
Telling Apache about our repository
Scroll to the very bottom of the file and add this block (I'll tell you about what each of these settings mean in a Minute, don't worry):
<Location /svn>
DAV svn
SVNParentPath c:\repos
AuthType Basic
AuthName "Subversion Repository"
AuthUserFile c:\svn-user-file
Require valid-user
</Location>
Ok, the first Setting is the <Location> Tag. This is the virtual Path on your Website to which this section applies.
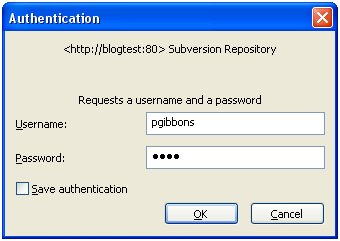
In other words: We have just created http://blogtest/svn and these settings will apply to it.
DAV svn tells Apache to use the mod_dav Module, and it tells the mod_dav module to use SVN here. Essentially, this like makes sure that the Subversion Apache Module is used here.
The next Setting is SVNParentPath. This setting points to the folder which we created earlier to hold our repositories. Now, there is one important thing to know about this setting: This is only to be used if you have multiple repositories under one common parent directory! In our case, we got repo1 and repo2 under c:\repos, and we want both to be accessible with the same settings. If you do not want to use multiple repositories or if you want to have specific settings for one repository, create a <Location> and use SVNPath instead. I will make an example for this later in this article, so if you are confused right now, just keep in mind: SVNParentPath = Multiple Repositories, SVNPath = Single Repository.
The next four lines are our settings for Authentication.
AuthType is the type of authentication used, and commonly, there are two options: "Basic" and "Digest". Basic authentication sends your password in cleartext over the line, whereas Digest encrypts it. Unfortunately, Digest is not very well supported by the SVN Client, which leaves us with Basic. If you are worried that your password may be sniffed or if you are accessing your SVN Server through the internet, make sure to use HTTPS instead of HTTP in your Apache!
AuthName is just a name that will be displayed to your user.
AuthUserFile is the file where we will store our usernames and passwords. We will create this file in a minute; let's just say for now that you should put this in a secure location.
Require will tell Apache which users can authenticate. Valid-user is any user in our password file.
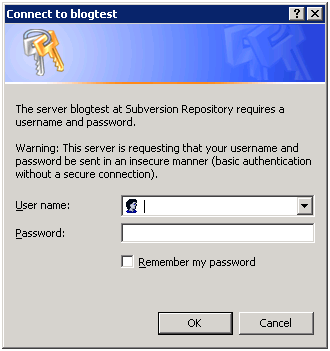
Save this, restart Apache and try to access http://blogtest/svn/repo1 - you should get a Password prompt. Cancel for now, as you can't authenticate anyway yet.
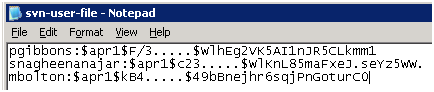
Creating the User file
Ok, Apache is all set, we want to create a user file now. We will use the Apache htpasswd tool, which you find in the Apache\bin directory.
htpasswd -cm c:\svn-user-file pgibbons
This will create the user file (-c) and add our first user, pgibbons. It will also ask us for a password.
Adding a second user is done without the –c switch, only –m is used:
htpassmd -m c:\svn-user-file snagheenanajar
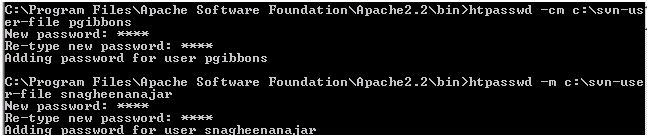
Make sure to read the section about security concern at the bottom of this article! We now have 2 users in our user file. Try accessing the site now and log in as pgibbons – if all went good, you should see your repository now.
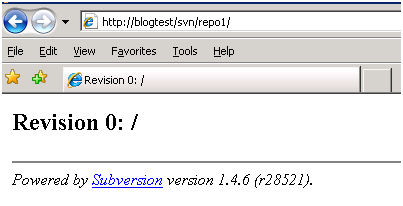
Please be aware that you have to give the full link to the repository. For example: http://blogtest/svn/repo1/ and http://blogtest/svn/repo2/ work, but http://blogtest/svn/ will not work and give a 403 forbidden error instead.
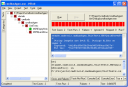
Your repository can also be accessed through any Subversion client, be it the command line svn.exe or for example TortoiseSVN:

Congratulations! You have just set up a Subversion Repository that is accessed through Apache Web Server and uses user authentication.
Bonus: Different Permissions for one repository
Ok, let's say we have a third repository, where everyone (including anonymous users) can read, but only 1 developer can commit. In our example, the repository is c:\repos\repo3 and only snagheenanajar should be able to commit to this. In your Apache httpd.conf, under your existing </Location> tag, add this:
<Location /svn/repo3>
DAV svn
SVNPath c:\repos\repo3
AuthType Basic
AuthName "Subversion Repository"
AuthUserFile c:\svn-user-file
<LimitExcept GET PROPFIND OPTIONS REPORT>
Require snagheenanajar
</LimitExcept>
</Location>
First off, the <Location> needs to be the name of your Repository, so that it overrides the previous setting that applied to the whole /svn virtual directory.
Then, notice that we use SVNPath instead of SVNParentPath. Remember: Multiple Repositories = SVNParentPath, Single Repository = SVNPath. As this section applies explicitely to repo3, we use SVNPath. The next 3 lines are our standard Auth Settings, but then it gets interesting. Essentially, we are telling the module to only Require user authentication if the commands are not one of the listed ones.
That means: Everyone is able to GET, PROPFIND, OPTIONS or REPORT, i.e. everyone can browse and check-out the repository. Try it: While http://blogtest/svn/repo1/ asks you for a user login, http://blogtest/svn/repo3/ does not. Now, if you want to commit, you will be asked as commit is not listed in the <LimitExcept>-clause. Here, instead of "Require valid-user", we explicitely require snagheenanajar as our user, which means that only he can commit to this repository.
Security Concern: Adding new users
When we add new users, we execute htpasswd and type in the credentials – but wait, we need to type in the password, which means that the Admin needs to know the user password. That is bad practice and should not be done. Instead, ask your users to generate their password hashes and only send you the hash. To do that, copy htpasswd.exe from your Apache\bin directory somewhere where it is accessible and have your users create their passwords using the -n switch:
htpasswd -m -n mbolton

Ask them to send you the line that they receive, and add it to the bottom of your userfile. You do not need to restart Apache when you change the user file by the way.
There are various other options available instead of using htpasswd. For example, have a web application where the user just types in username and password, and the result is automatically mailed to the admin or automatically added to the file – be creative, but always keep in mind that telling the Admin the password in cleartext is a big No-No.
That concludes Part 2 of this series. You now have a working Subversion Environment that supports User Authentication and runs on a Windows Server. In the next Article of this series, we look at automated backups, because Source Control is worthless without backups.
March 24th, 2008 in
Development
A new Version of the CommandLine Tools has just been released. These are the changes:
InfoPath 2007 URN Changer (cmdxsnurn)
This is a new tool in this package.
Form Templates created with InfoPath have a Unique Identifier, the URN, which usually looks like this:
urn:schemas-microsoft-com:office:infopath:TP1:-myXSD-2008-03-21T17-29-57
Notice that there is a DateTime String at the end, which never changes. However, when using InfoPath Templates on a Sharepoint Server as Task Forms, they are cached. While it is possible to remove the cached versions on the server-side, they are sometimes also cached on the client side, i.e. Outlook 2007 caches them, and there seems to be no easy solution to delete them from the Outlook cache (if you know a way, please please let me know! :-))
Changing a URN in InfoPath is also not easy: You have to extract the .xsn file, manually edit each file, and package them again into a .xsn. This is where this tool comes in: It allows you to easily change the DateTime Part of the URN by doing all the work for you. As a Bonus, it also has an option to extract the template.xml file from the .xsn file.
Send Mail (cmdsendmail)
- New "replacetokens" Attribute on <body> and <subject>
If this is set to TRUE, several tokens will be replaced.
Tokens:
##datenow##
The current Date in yyyy-MM-dd format, i.e. 2008-03-22
##timenow##
The current Time in HH:mm:ss format, i.e. 16:02:22
.net SVN Revision Replace (cmdnetsvnrev)
- New /v Parameter to change the Assembly(File)Version completely
This will change the AssemblyVersion to x.x.x.svnrev.
EXAMPLE:
cmdnetsvnrev /v 12.0.3 /r http://svn/repo /c z:\buildsrc
This will Change the AssemblyVersion and AssemblyFileVersion to 12.0.3.80, assuming that your SVN Repo is Revision 80. If the /Version switch is in any other format (i.e. 1.0 or 1.a), it will be ignored. Using values >65535 will work, but may lead to compiler errors.
March 22nd, 2008 in
My Tools,
Sharepoint
Imagine you have a StateMachine Workflow with multiple states. Say, you want to be smart and save some activities in a large (or small) IfElseActivity. Lets assume you have 1 Branch that should move the workflow into someState, whereas all other Branches should move the workflow into someOtherState. You may be tempted to do something like this:
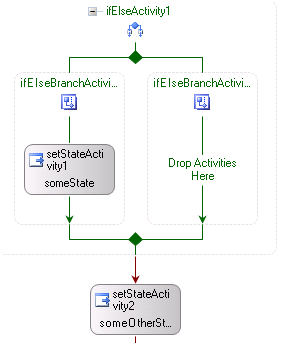
Don't to that. Because the setStateActivity does not act as a "STOP"-Sign for the current state, the workflow will still continue the rest of this activity, and it seems to ignore all setStateActivities except the last one it encounters in it's execution path. So in the example above, you will end up on someOtherState regardless if the IfElse-Branch is executed or not. In fact, someState does not seem to be executed at all, as none of the StateInitialization Activies execute.
March 21st, 2008 in
Development,
Sharepoint
There is more to Development than just the IDE. There are countless of little helper tools for certain tasks. Here is a collection of the tools that I use. As a Hobbyist, I try to stay with free tools whenever possible, and here are 3 free tools I never want to miss again.
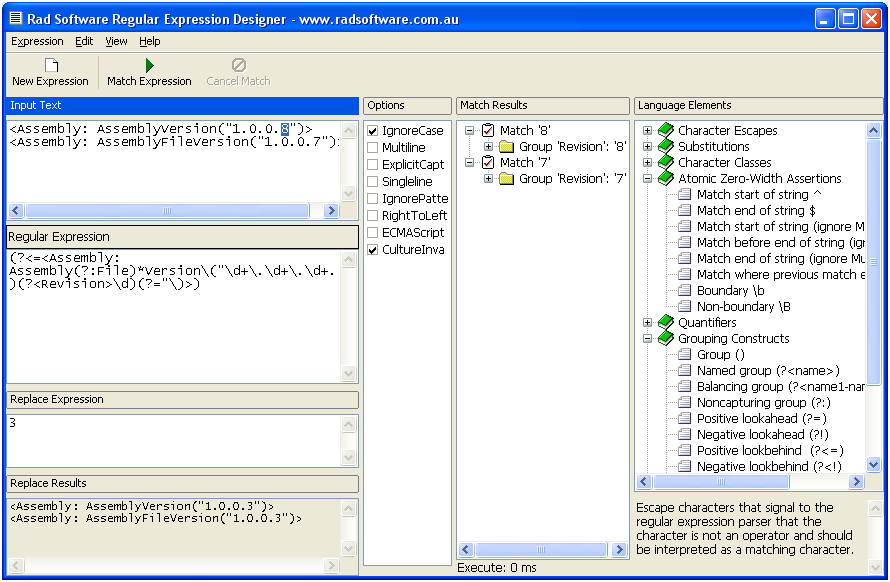
Regular Expressions: Rad Software Regular Expression Designer

Ahhh, Regular Expressions, one of the best inventions since the invention of complex text that needs to be parsed. As nice as those regular expressions are, if you don't use them that often, the syntax is a bit hard to memorize. What was the syntax for positive lookbehind again, combined with a named group, when searching for three digits? Is a certain regex greedy or non-greedy?
This Regex "Sandbox" is god-sent. It was made in .net and therefore uses the same Regex Engine, and it supports not only Matching but also replacing. Previously, I often used more-or-less complicated String.Replace/String.Indexof constructs because I did not want to look up and spend 10 minutes of try-and-error Regex-writing. With this tool, I've started to use Regex for almost everything because it's so easy to work with it.
It's available at http://www.radsoftware.com.au/regexdesigner/
Hex Editor: XVI32
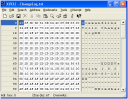
Every once in a while, it's needed to check the binary content of a file. Are the linebreaks \n or \r\n? Are there any NULL-Characters (\0) in the file? Is there a UTF-8 Preamble in the file?
XVI32 is a free Hex Editor that does not need installation and just does its job – nothing more, but also nothing less. It's available at http://www.chmaas.handshake.de/delphi/freeware/xvi32/xvi32.htm
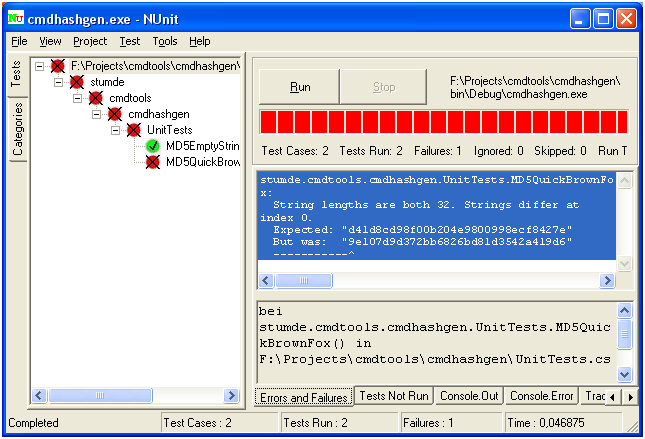
Unit Testing: NUnit
Ok, Unit Testing would deserve a posting on its own, but there are already plenty available 🙂 One of the drawbacks of Visual Studio Professional is that it does not contain integrated Unit testing. This critical feature is only available in the bigger and much more expensive Team editions, which sucks.
Luckily, there are alternatives available. I use NUnit, which is a very mature and well-supported product, and it already includes both a GUI and a Console Test Runner.
You can get it from http://www.nunit.org/
March 19th, 2008 in
Development
When developing solutions for Sharepoint, it is important to dispose some object after use, for example SPSites and SPWebs created by you. But it is not always obvious when Dispose() should be called, and when it should not be called.
Roger Lamb made an excellent Posting about this subject, and it's maybe the single most important posting to read when doing Sharepoint Development.
Edit: Roger did not mention Workflows, and I made some tests that actually show the results you would expect: workflowProperties.Web should not be Disposed, the Workflow Runtime will take care of that. Same applies to workflowProperties.Item.Web.
March 18th, 2008 in
Development,
Sharepoint
One of the nicest Features of Word 2007 is the Blog support. I use it normally to write Posts for an internal Blog that's hosted on Sharepoint 2007, and I always said to myself "How cool would it be if I could use Word 2007 for WordPress as well?" Nothing against the JavaScript editor that comes with WordPress, but Word 2007 is quite a bit better.
Well, since a few minutes I feel really stupid, because Word 2007 actually supports WordPress, out of the box. Even Image Uploading works properly, and so do categories.
Thanks to the guy who wrote this article for pointing out something that should have been clear to me if I would just had RTFM... Now the best blogging system actually has a really good editor as well 🙂 (Edit: Just Words Smiley-Conversion is still a problem, as the result is the famous Span-Wingdings-J instead of the Smiley...)
March 17th, 2008 in
Misc. | tags:
blog,
office 2007,
winword
For my Build Environment, I use Subversion (SVN) as my Source Control system. Normally, Linux (or another *nix) is the operating system that is being frequently used for this, but I have an existing Windows 2003 Server that I wanted to use.
This multi-part posting series will explain:
- How to set up an Apache Web Server to run in parallel with IIS
- Installing Subversion with Apache integration and user authentication
- Automatic Backups using WinRAR and cmdsendmail
- Writing an automated Buildscript
These articles were made on a Windows 2003 Server, Web Edition. Generally, every Windows Version should work, even XP Home or Vista Basic.
Part 1: Setting up the Apache Web Server
While it may be somehow possible to run Subversion on IIS, Apache Web Server is the server of choice here. If you are running a Windows Server, you may already have IIS installed, and thus the question might come up: How to run IIS and Apache in parallel? While IIS is not relevant for our build environment, I wanted to keep it for some other stuff running on that machine.
Before we start, let’s first download Apache. On http://httpd.apache.org/ you will find a Download link in the Menu, where you can download a MSI Installer. I used Version 2.2.8 incl. OpenSSL (apache_2.2.8-win32-x86-openssl-0.9.8g.msi).
If you have no desire to run IIS in parallel to Apache, feel free to skip the next section and jump to "Setting up Apache".
Now, we have to decide which approach we want to use to run 2 Web servers in parallel. The two options which are really apparent here:
- Run them on different ports
- Run each one on a different IP address
Personally, I don’t like web servers running on other ports than 80 (or 443 for SSL). Also, the idea to run IIS in HTTP and Apache in HTTPS mode seems logical. But I’ve chosen the second approach: Give the server 2 IP addresses and run the IIS on the second IP address. Together with 2 different Names on the DNS Server, this gives a clear separation with the ability to still run HTTP and HTTPS on each server without having to use non-standard ports. Note that there may be more options (Host Headers, funky VLAN/Router configurations…), but this is not an IIS Reference Guide 🙂
The server name is "blogtest" and the IP Addresses are 10.23.42.160 and 10.23.42.161. I will limit IIS to .161. My DNS Server is configured to resolve "blogtest" to .160 and "btestiis" to .161.
Disabling IIS Socket Pooling
Per default, IIS binds itself to all IP Addresses on the server and therefore blocks port 80 on both IP Addresses. We want to disable this so-called "Socket Pooling" and only bind it to .161, as detailed in Microsoft’s Knowledgebase Article 813368:
C:\Program Files\Support Tools>httpcfg set iplisten -i 10.23.42.161
HttpSetServiceConfiguration completed with 0.

C:\Program Files\Support Tools>httpcfg query iplisten
IP                      : 10.23.42.161
------------------------------------------------------------------------------
With this option set, IIS will not touch the .160 IP anymore. (Remember to net stop/start the service after this change).
Be advised that this is a global IIS change. So even if you set a Website to "(All Unassigned)" or even explicitly to .160, it will not respond on .160 (or any IP address other than the ones you added using httpcfg set ilisten -I) anymore.
Setting up Apache
Ok, IIS is out of the way now. Let’s start installing Apache. When you are prompted to enter the server details, make sure that "For all users, on Port 80" is selected, so that Apache installs itself as service.
When you have finished installing Apache, it’s time to look at the configuration. You can find it here (per Default):
C:\Program Files\Apache Software Foundation\Apache2.2\conf
The file is called httpd.conf and we need to make sure Apache only binds to .160.
Scroll down until you come to this part:
# Listen: Allows you to bind Apache to specific IP addresses and/or
# ports, instead of the default. See also the <virtualhost>
# directive.
#
# Change this to Listen on specific IP addresses as shown below to
# prevent Apache from glomming onto all bound IP addresses.
#
#Listen 12.34.56.78:80
Listen 80
Note the "Listen 80". Change this to
Listen 10.23.42.160:80
Save the file and restart Apache (there is a little tray icon, or look in services.msc).
Bonus: Enable HTTPS on Apache
You may want to enable HTTPS as well on Apache, if it’s being exposed to the Internet. Since my server is only used internally, I have no use for HTTPS yet. If you need HTTPS support, have a look at this article. (Note that OpenSSL and mod_ssl are already included in the "Win32 Binary including OpenSSL" download Packages at Apache.org)
Conggratulations! You have now successfully set up Apache and IIS in friendly co-existence on one server.
This concludes Part 1 of this series. Now that we have our web server running, we’ll install Subversion and set up authentication.
March 16th, 2008 in
Development